SpringBoot 从入门到光头 —— 第五章 Web 开发
1. SpringMVC 自动配置概览
*Spring Boot provides auto-configuration for Spring MVC that works well with most applications.*(大多场景我们都无需自定义配置)
The auto-configuration adds the following features on top of Spring’s defaults:
- Inclusion of
ContentNegotiatingViewResolverandBeanNameViewResolverbeans.- 内容协商视图解析器和 BeanName 视图解析器
- Support for serving static resources, including support for WebJars (covered later in this document).
- 静态资源(包括webjars)
- Automatic registration of
Converter,GenericConverter, andFormatterbeans.- 自动注册
Converter,GenericConverter,Formatter
- 自动注册
- Support for
HttpMessageConverters(covered later in this document).- 支持
HttpMessageConverters(后来我们配合内容协商理解原理)
- 支持
- Automatic registration of
MessageCodesResolver(covered later in this document).- 自动注册
MessageCodesResolver(国际化用)
- 自动注册
- Static
index.htmlsupport.- 静态
index.html页支持
- 静态
- Cutom
Faviconsupport (covered later in this document).- 自定义
Favicon
- 自定义
- Automatic use of a
ConfigurableWebBindingInitializerbean (covered later in this document).- 自动使用
ConfigurableWebBindingInitializer,(DataBinder负责将请求数据绑定到JavaBean上)
- 自动使用
If you want to keep those Spring Boot MVC customizations and make more MVC customizations (interceptors, formatters, view controllers, and other features), you can add your own
@Configurationclass of typeWebMvcConfigurerbut without@EnableWebMvc.不用
@EnableWebMvc注解。使用@Configuration+WebMvcConfigurer自定义规则
If you want to provide custom instances of
RequestMappingHandlerMapping,RequestMappingHandlerAdapter, orExceptionHandlerExceptionResolver, and still keep the Spring Boot MVC customizations, you can declare a bean of typeWebMvcRegistrationsand use it to provide custom instances of those components.声明
WebMvcRegistrations改变默认底层组件
If you want to take complete control of Spring MVC, you can add your own
@Configurationannotated with@EnableWebMvc, or alternatively add your own@Configuration-annotatedDelegatingWebMvcConfigurationas described in the Javadoc of@EnableWebMvc.使用
@EnableWebMvc+@Configuration+DelegatingWebMvcConfiguration全面接管SpringMVC
2. 简单功能分析
2.1. 静态资源访问
1. 静态资源目录
只要静态资源放在 类路径 下:/static(或者是 /public、/resources、/META_INF/resources
访问:当前项目根路径/ + 静态资源名
原理:静态映射 /**
请求进来之后,先去找 Controller 看能不能处理。不能处理的所有请求都交给静态资源处理器。静态资源也找不到则响应 404 页面
改变默认的静态资源路径方法:
application.yaml
spring:
  mvc:
    static-path-pattern: /res/**

 web:
    resources:
      static-locations: [classpath:/haha/]
2. 静态资源访问前缀
默认情况下是没有前缀的
如何配置访问前缀:
application.yaml
spring:
  mvc:
    static-path-pattern: /res/**
访问路径: 当前项目 + static--path-pattern + 静态资源名 = 静态资源文件下查找
3. webjar
自动映射 /webjars/jquery/3.5.1/jquery.js/**
pom.xml
<dependency>
    <groupId>org.webjars</groupId>
    <artifactId>jquery</artifactId>
    <version>3.5.1</version>
</dependency>
访问地址:http://localhost:8080/webjars/jquery/3.5.1/jquery.js (webjars 后面的地址需要按照依赖里面的包路径)
2.2. 欢迎页支持
静态资源路径下
index.html可以配置静态资源路径
但是不可以配置静态资源的访问前缀。否则导致
index.html不能被默认访问spring: # mvc: # static-path-pattern: /res/** # 上面的配置会导致 welcome.page 失效 web: resources: static-locations: [classpath:/haha/]
Controller 能处理
/index请求
2.3. 自定义 Favicon
将 favicon.ico 放在静态资源目录下即可
注意⚠️:static-path-pattern: 配置也会导致 Favicon 功能失效
spring:
#  mvc:
#    static-path-pattern: /res/**
# 上面的配置会导致 Favicon 失效
2.4. 静态资源配置原理
SpringBoot 启动默认加载
xxxAutoConfiguration类(自动配置类)SpringMVC 功能的自动配置类
WebMvcAutoConfiguration,生效条件:@Configuration(proxyBeanMethods = false) @ConditionalOnWebApplication(type = Type.SERVLET) @ConditionalOnClass({ Servlet.class, DispatcherServlet.class, WebMvcConfigurer.class }) @ConditionalOnMissingBean(WebMvcConfigurationSupport.class) @AutoConfigureOrder(Ordered.HIGHEST_PRECEDENCE + 10) @AutoConfigureAfter({ DispatcherServletAutoConfiguration.class, TaskExecutionAutoConfiguration.class, ValidationAutoConfiguration.class }) public class WebMvcAutoConfiguration { }对容器的配置如下:
@SuppressWarnings("deprecation")
@Configuration(proxyBeanMethods = false)
@Import(EnableWebMvcConfiguration.class)
@EnableConfigurationProperties({ WebMvcProperties.class,
        org.springframework.boot.autoconfigure.web.ResourceProperties.class, WebProperties.class })
@Order(0)
public static class WebMvcAutoConfigurationAdapter implements WebMvcConfigurer, ServletContextAware {

}
配置文件的相关属性和什么进行了绑定:
WebMvcProperties→spring.mvcResourceProperties→spring.resources
1. 配置类只有一个有参构造器
org.springframework.boot.autoconfigure.web.servlet.WebMvcAutoConfiguration
public WebMvcAutoConfigurationAdapter(
org.springframework.boot.autoconfigure.web.ResourceProperties resourceProperties,
WebProperties webProperties, WebMvcProperties mvcProperties, ListableBeanFactory beanFactory,
ObjectProvider<HttpMessageConverters> messageConvertersProvider,
ObjectProvider<ResourceHandlerRegistrationCustomizer> resourceHandlerRegistrationCustomizerProvider,
ObjectProvider<DispatcherServletPath> dispatcherServletPath,
ObjectProvider<ServletRegistrationBean<?>> servletRegistrations) {
this.resourceProperties = resourceProperties.hasBeenCustomized() ? resourceProperties
: webProperties.getResources();
this.mvcProperties = mvcProperties;
this.beanFactory = beanFactory;
this.messageConvertersProvider = messageConvertersProvider;
this.resourceHandlerRegistrationCustomizer = resourceHandlerRegistrationCustomizerProvider.getIfAvailable();
this.dispatcherServletPath = dispatcherServletPath;
this.servletRegistrations = servletRegistrations;
this.mvcProperties.checkConfiguration();
}
- 有参构造器所有参数的值都会从容器中确定
ResourceProperties resourceProperties:获取和spring.resources绑定的所有值的对象ListableBeanFactory beanFactory:Spring 的beanFactoryHttpMessageConverters:找到所有的HttpMessageConverterResourceHandlerRegistrationCustomizer:找到资源处理器的自定义器DispatcherServletPath:DispatcherServlet允许处理的路径ServletRegistrationBean<?>:给应用注册原生的 Servlet、Listener、Filter…
2. 资源处理的默认规则
org.springframework.boot.autoconfigure.web.servlet.WebMvcAutoConfiguration
@Override
public void addResourceHandlers(ResourceHandlerRegistry registry) {
    if (!this.resourceProperties.isAddMappings()) {
        logger.debug("Default resource handling disabled");
        return;
    }
  // 新版本使用 Lambda 表达式简化代码
    addResourceHandler(registry, "/webjars/**", "classpath:/META-INF/resources/webjars/");
    addResourceHandler(registry, this.mvcProperties.getStaticPathPattern(), (registration) -> {
            registration.addResourceLocations(this.resourceProperties.getStaticLocations());
            if (this.servletContext != null) {
                ServletContextResource resource = new ServletContextResource(this.servletContext, SERVLET_LOCATION);
                registration.addResourceLocations(resource);
            }
    });
}
以下规则可以禁用所有静态资源加载:
application.yamlspring: resources: add-mappings: false # 禁用所有静态资源规则webjars的规则:addResourceHandler(registry, "/webjars/**", "classpath:/META-INF/resources/webjars/");静态资源的四个默认位置:
org.springframework.boot.autoconfigure.web.WebPropertiespublic static class Resources { private static final String[] CLASSPATH_RESOURCE_LOCATIONS = { "classpath:/META-INF/resources/", "classpath:/resources/", "classpath:/static/", "classpath:/public/" }; }
3.欢迎页的处理规则
org.springframework.boot.autoconfigure.web.servlet.WebMvcAutoConfiguration
@Bean
public WelcomePageHandlerMapping welcomePageHandlerMapping(ApplicationContext applicationContext,
        FormattingConversionService mvcConversionService, ResourceUrlProvider mvcResourceUrlProvider) {
    WelcomePageHandlerMapping welcomePageHandlerMapping = new WelcomePageHandlerMapping(
            new TemplateAvailabilityProviders(applicationContext), applicationContext, getWelcomePage(),
            this.mvcProperties.getStaticPathPattern());
    welcomePageHandlerMapping.setInterceptors(getInterceptors(mvcConversionService, mvcResourceUrlProvider));
    welcomePageHandlerMapping.setCorsConfigurations(getCorsConfigurations());
    return welcomePageHandlerMapping;
}
HandlerMapping:处理器映射器,保存了每一个Handler能处理那些请求要使用欢迎页默认静态路径必须是
/**的原因:
org.springframework.boot.autoconfigure.web.servlet.WelcomePageHandlerMappingWelcomePageHandlerMapping(TemplateAvailabilityProviders templateAvailabilityProviders, ApplicationContext applicationContext, Resource welcomePage, String staticPathPattern) { if (welcomePage != null && "/**".equals(staticPathPattern)) { logger.info("Adding welcome page: " + welcomePage); setRootViewName("forward:index.html"); } else if (welcomeTemplateExists(templateAvailabilityProviders, applicationContext)) { logger.info("Adding welcome page template: index"); setRootViewName("index"); } }setRootViewName("index");:调用能够处理/index请求的 Controller
4. Favicon
浏览器会发送 /favicon.ico 请求获取到图标,在整个 session 期间不再获取
3. 请求参数处理
3.1. 请求映射
1. REST 的使用与原理
@xxxMappingREST 风格支持(使用 HTTP 请求方式动词来表示对资源的操作)
以前:
/getUser获取用户、/deleteUser删除用户、/updateUser修改用户、/addUser添加用户现在:
/user+ 请求方式:GET获取用户、DELETE删除用户、PUT修改用户、POST添加用户核心 Filter:
HiddenHttpMethodFilter用法(以 PUT 为例): 在表单中:
method=post,隐藏域:_method=put<form action="/user" method="post"> <input name="_method" type="hidden" value="PUT"/> <input value="REST-PUT 提交" type="submit"/> </form>注意⚠️:SpringBoot 中需要手动配置开启 REST 风格:
spring: mvc: hiddenmethod: filter: enabled: true需要手动开启配置的原因:
org.springframework.boot.autoconfigure.web.servlet.WebMvcAutoConfiguration@Bean @ConditionalOnMissingBean(HiddenHttpMethodFilter.class) @ConditionalOnProperty(prefix = "spring.mvc.hiddenmethod.filter", name = "enabled", matchIfMissing = false) public OrderedHiddenHttpMethodFilter hiddenHttpMethodFilter() { return new OrderedHiddenHttpMethodFilter(); }
使用示例:
com.yourname.boot.controller.HelloController/** * @author gregPerlinLi * @since 2021-10-26 */ @RestController public class HelloController { @RequestMapping("/Logo.jpg") public String hello() { return "aaaa"; } @RequestMapping(value = "/user",method = RequestMethod.GET) public String getUser(){ return "GET-张三"; } @RequestMapping(value = "/user",method = RequestMethod.POST) public String saveUser(){ return "POST-张三"; } @RequestMapping(value = "/user",method = RequestMethod.PUT) public String putUser(){ return "PUT-张三"; } @RequestMapping(value = "/user",method = RequestMethod.DELETE) public String deleteUser(){ return "DELETE-张三"; } }
Rest原理(表单提交要使用REST的时候)
- 表单提交会带上
_method=PUT - 请求过来被
HiddenHttpMethodFilter拦截- 请求是否正常,并且是POST
- 获取到
_method的值。 - 兼容以下请求:
PUT、DELETE、PATCH - 原生 Request(
post),包装模式的requestWrapper重写了getMethod方法,返回的是传入的值。 - 过滤器链放行的时候使用
wrapper作为 Request 的对象进行放行。以后的方法调用getMethod就是调用requestWrapper。
- Rest 使用客户端工具
- 在使用如 PostMan、Apifox 等客户端直接发送
PUT、DELETE等方式请求时,无需 Filter(也就意味着无需在配置文件中手动开启配置)
- 在使用如 PostMan、Apifox 等客户端直接发送
Handler 针对 REST 功能的简化:
com.yourname.boot.controller.HelloController
/**
* @author gregPerlinLi
* @since 2021-10-26
*/
@RestController
public class HelloController {
@RequestMapping(value = "/Logo.jpg")
public String hello() {
return "aaaa";
}
@GetMapping(value = "/user")
public String getUser(){
return "GET-张三";
}
@PostMapping(value = "/user")
public String saveUser(){
return "POST-张三";
}
@PutMapping(value = "/user")
public String putUser(){
return "PUT-张三";
}
@DeleteMapping(value = "/user")
public String deleteUser(){
return "DELETE-张三";
}
}
如何将 _method 自定义成自己想要的名字:
com.yourname.boot.config.WebConfig
/**
* Customize filter
*
* @author gregPerlinLi
* @since 2021-10-27
*/
@Configuration(proxyBeanMethods = false)
public class WebConfig {
@Bean
public HiddenHttpMethodFilter hiddenHttpMethodFilter(){
HiddenHttpMethodFilter methodFilter = new HiddenHttpMethodFilter();
methodFilter.setMethodParam("_m");
return methodFilter;
}
}
2. 请求映射原理
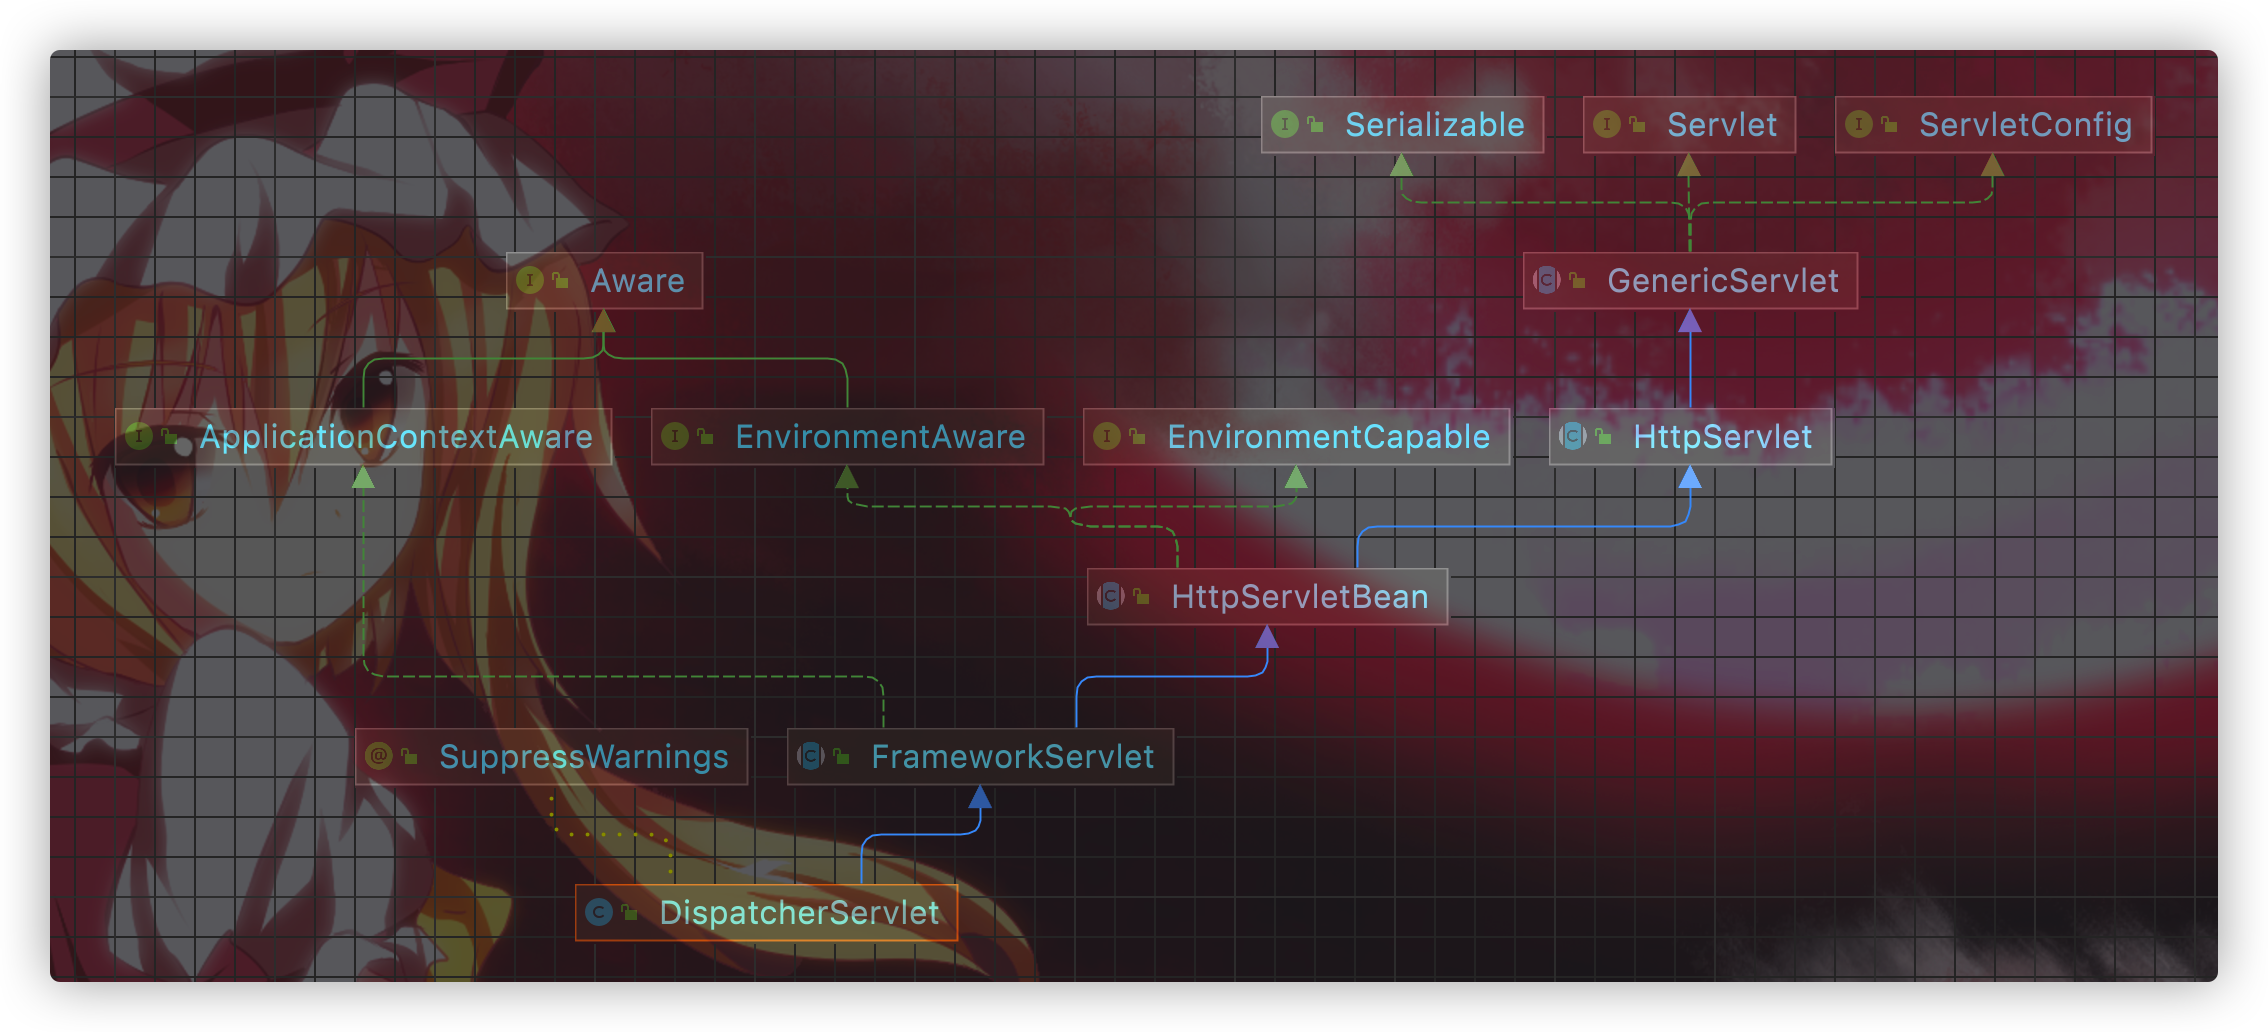
HttpServlet.doGet() → FrameworkServlet.processRequest → FrameworkServlet.doServer() → DispatcherServlet.doService() → DispatcherServlet.doDispatch()
对 SpringMVC 的功能分析都应从 org.springframework.web.servlet.DispatcherServlet.doDispatch() 方法开始
@SuppressWarnings("deprecation")
protected void doDispatch(HttpServletRequest request, HttpServletResponse response) throws Exception {
HttpServletRequest processedRequest = request;
HandlerExecutionChain mappedHandler = null;
boolean multipartRequestParsed = false;
WebAsyncManager asyncManager = WebAsyncUtils.getAsyncManager(request);
try {
ModelAndView mv = null;
Exception dispatchException = null;
try {
processedRequest = checkMultipart(request);
multipartRequestParsed = (processedRequest != request);
// Determine handler for the current request.
mappedHandler = getHandler(processedRequest);
if (mappedHandler == null) {
noHandlerFound(processedRequest, response);
return;
}
// Determine handler adapter for the current request.
HandlerAdapter ha = getHandlerAdapter(mappedHandler.getHandler());
// Process last-modified header, if supported by the handler.
String method = request.getMethod();
boolean isGet = HttpMethod.GET.matches(method);
if (isGet || HttpMethod.HEAD.matches(method)) {
long lastModified = ha.getLastModified(request, mappedHandler.getHandler());
if (new ServletWebRequest(request, response).checkNotModified(lastModified) && isGet) {
return;
}
}
if (!mappedHandler.applyPreHandle(processedRequest, response)) {
return;
}
// Actually invoke the handler.
mv = ha.handle(processedRequest, response, mappedHandler.getHandler());
if (asyncManager.isConcurrentHandlingStarted()) {
return;
}
applyDefaultViewName(processedRequest, mv);
mappedHandler.applyPostHandle(processedRequest, response, mv);
}
catch (Exception ex) {
dispatchException = ex;
}
catch (Throwable err) {
// As of 4.3, we're processing Errors thrown from handler methods as well,
// making them available for @ExceptionHandler methods and other scenarios.
dispatchException = new NestedServletException("Handler dispatch failed", err);
}
processDispatchResult(processedRequest, response, mappedHandler, mv, dispatchException);
}
catch (Exception ex) {
triggerAfterCompletion(processedRequest, response, mappedHandler, ex);
}
catch (Throwable err) {
triggerAfterCompletion(processedRequest, response, mappedHandler,
new NestedServletException("Handler processing failed", err));
}
finally {
if (asyncManager.isConcurrentHandlingStarted()) {
// Instead of postHandle and afterCompletion
if (mappedHandler != null) {
mappedHandler.applyAfterConcurrentHandlingStarted(processedRequest, response);
}
}
else {
// Clean up any resources used by a multipart request.
if (multipartRequestParsed) {
cleanupMultipart(processedRequest);
}
}
}
}
mappedHandler = getHandler(processedRequest);:找到当前请求使用哪个 Handler(Controller的方法)处理HandlerMapping: 处理器映射
RequestMappingHandlerMapping: 保存了所有的@RequestMapping和 Handler 映射规则
所有的请求都保存在 HandlerMapping 中
SpringBoot 自动配置欢迎页的
WelcomePageHandlerMapping,当访问/的时候能访问到index.htmlSpringBoot 自动配置了默认 的
RequestMappingHandlerMapping请求进来,挨个尝试所有的
HandlerMapping看是否有请求信息- 如果有就找到这个请求对应的 Handler
- 如果没有就是下一个
HandlerMapping
我们需要一些自定义的映射处理,我们也可以自己给容器中放
HandlerMapping,自定义HandlerMapping:protected HandlerExecutionChain getHandler(HttpServletRequest request) throws Exception { if (this.handlerMappings != null) { for (HandlerMapping mapping : this.handlerMappings) { HandlerExecutionChain handler = mapping.getHandler(request); if (handler != null) { return handler; } } } return null; }
3.2. 普通参数与基本注解
1. 使用注解
@PathVariable:路径变量@RequestHeader:获取请求头@RequestParam:获取请求参数@CookieValue:获取 cookie 值@RequestBody:获取请求体(用于 POST 请求)@equestAttribute:获取 Request 域属性@MatrixVariable:矩阵变量(常用于在无法使用 Cookie 时使用 URL 重写方法在矩阵变量中传递参数)
示例代码:
index.html
<!DOCTYPE html>
<html lang="en">
<head>
<meta charset="UTF-8">
<title>Index</title>
<style type="text/css">
body {
font-family: Futura, "PingFang SC", Helvetica, Arial, sans-serif;
}
</style>
</head>
<body>
<h1>Welcome to index</h1>
测试REST风格;
<form action="/user" method="get">
<input value="REST-GET 提交" type="submit"/>
</form>
<form action="/user" method="post">
<input value="REST-POST 提交" type="submit"/>
</form>
<form action="/user" method="post">
<input name="_method" type="hidden" value="delete"/>
<input name="_m" type="hidden" value="delete"/>
<input value="REST-DELETE 提交" type="submit"/>
</form>
<form action="/user" method="post">
    <input name="_method" type="hidden" value="PUT"/>
    <input value="REST-PUT 提交" type="submit"/>
</form>
<hr/>
测试基本注解:
<ul>
<a href="car/3/owner/lisi?age=18&inters=basketball&inters=game">car/{id}/owner/{username}</a>
<li>@PathVariable(路径变量)</li>
<li>@RequestHeader(获取请求头)</li>
<li>@RequestParam(获取请求参数)</li>
<li>@CookieValue(获取cookie值)</li>
<li>@RequestBody(获取请求体[POST])</li>
<li>@RequestAttribute(获取request域属性)</li>
<li>@MatrixVariable(矩阵变量)</li>
</ul>
/cars/{path}?xxx=xxx&aaa=ccc queryString 查询字符串。@RequestParam;<br/>
/cars/sell;low=34;brand=byd,audi,yd ;矩阵变量 <br/>
页面开发,cookie禁用了,session里面的内容怎么使用;
session.set(a,b)---> jsessionid ---> cookie ----> 每次发请求携带。
url重写:/abc;jsesssionid=xxxx 把cookie的值使用矩阵变量的方式进行传递.
/boss/1/2
/boss/1;age=20/2;age=20
<a href="/cars/sell;low=34;brand=byd,audi,yd">@MatrixVariable(矩阵变量)</a>
<a href="/cars/sell;low=34;brand=byd;brand=audi;brand=yd">@MatrixVariable(矩阵变量)</a>
<a href="/boss/1;age=20/2;age=10">@MatrixVariable(矩阵变量)/boss/{bossId}/{empId}</a>
<br/>
<form action="/save" method="post">
测试@RequestBody获取数据 <br/>
用户名:<input name="userName"/> <br>
邮箱:<input name="email"/>
<input type="submit" value="提交"/>
</form>
<ol>
<li>矩阵变量需要在SpringBoot中手动开启</li>
<li>根据RFC3986的规范,矩阵变量应当绑定在路径变量中!</li>
<li>若是有多个矩阵变量,应当使用英文符号;进行分隔。</li>
<li>若是一个矩阵变量有多个值,应当使用英文符号,进行分隔,或之命名多个重复的key即可。</li>
<li>如:/cars/sell;low=34;brand=byd,audi,yd</li>
</ol>
<br>
</body>
</html>
com.yourname.boot.config.WebConfig
/**
 * Customize filter
 *
 * @author gregPerlinLi
 * @since 2021-10-27
 */
@Configuration(proxyBeanMethods = false)
public class WebConfig {
    @Bean
    public HiddenHttpMethodFilter hiddenHttpMethodFilter(){
        HiddenHttpMethodFilter methodFilter = new HiddenHttpMethodFilter();
        methodFilter.setMethodParam("_m");
        return methodFilter;
    }
        /**
         * Enable matrix variable
         */
    @Bean
    public WebMvcConfigurer webMvcConfigurer() {
        return new WebMvcConfigurer() {
            @Override
            public void configurePathMatch(PathMatchConfigurer configurer) {
                UrlPathHelper urlPathHelper = new UrlPathHelper();
                // Do not remove content after semicolon
                urlPathHelper.setRemoveSemicolonContent(false);
                configurer.setUrlPathHelper(urlPathHelper);
            }
        };
    }
}
com.yourname.boot.controller.ParameterTestController
/**
* @author gregPerlinLi
* @since 2021-10-27
*/
@RestController
public class ParameterTestController {
@GetMapping(value = "/car/{id}/owner/{username}")
public Map getCar(@PathVariable("id") Integer id,
@PathVariable("username") String username,
@PathVariable Map<String, String> pv,
@RequestHeader("User-Agent") String userAgent,
@RequestHeader Map<String, String> headers,
@RequestParam("age") Integer age,
@RequestParam("inters") List<String> inters,
@RequestParam Map<String, String> params,
@CookieValue("Idea-a5f91748") String idea,
@CookieValue("Idea-a5f91748") Cookie cookie) {
Map<String, Object> map = new HashMap<>(1000);
map.put("id", id);
map.put("name", username);
map.put("pv", pv);
map.put("userAgent", userAgent);
map.put("headers", headers);
map.put("age", age);
map.put("inters", inters);
map.put("params", params);
map.put("Idea-a5f91748", idea);
System.out.println(cookie.getName() + " ===>> " + cookie.getValue());
return map;
}
@PostMapping(value = "/save")
public Map<String, Object> postMethod(@RequestBody String content) {
Map<String, Object> map = new HashMap<>(1000);
map.put("content", content);
return map;
}
/**
* 1. Matrix grammar: /cars/sell;low=34;brand=byd,audi,yd<br/>
* 2. SpringBoot disables matrix variables by default and needs to be enabled manually<br/>
* 3. The matrix variable must have a URL path variable to be resolved
*
* @param low low
* @param brand brand
* @return map
*/
@GetMapping(value = "/cars/{path}")
public Map carsSell(@MatrixVariable("low") Integer low,
@MatrixVariable("brand") List<String> brand,
@PathVariable String path) {
Map<String, Object> map = new HashMap<>(1000);
map.put("low", low);
map.put("brand", brand);
map.put("path", path);
return map;
}
@GetMapping(value = "/boss/{bossId}/{empId}")
public Map boss(@MatrixVariable(value = "age", pathVar = "bossId") Integer bossAge,
@MatrixVariable(value = "age", pathVar = "empId") Integer empAge) {
Map<String, Object> map = new HashMap<>(1000);
map.put("bossAge", bossAge);
map.put("empAge", empAge);
return map;
}
}
com.yourname.boot.controller.RequestController
/**
* @author gregPerlinLi
* @since 2021-10-27
*/
@Controller
public class RequestController {
@GetMapping(value = "/goto")
public String goToString(HttpServletRequest request) {
request.setAttribute("msg", "Success!!!");
request.setAttribute("code", 200);
return "forward:/success";
}
@ResponseBody
@GetMapping(value = "/success")
public Map success(@RequestAttribute("msg") String msg,
@RequestAttribute("code") Integer code,
HttpServletRequest request) {
Object msg1 = request.getAttribute("msg");
Map<String, Object> map = new HashMap<>(1000);
map.put("reqMethod_msg", msg1);
map.put("annotation_msg", msg);
return map;
}
}
2. Servlet API
WebRequestServletRequestMultipartRequestHttpSessionjavax.servlet.http.PushBuilderPrincipalInputStreamReaderHttpMethodLocaleTimeZoneZoneId
ServletRequestMethodArgumentResolver 可以解析以上部分的参数
org.springframework.web.servlet.mvc.method.annotation.ServletRequestMethodArgumentResolver.supportsParameter()
@Override
public boolean supportsParameter(MethodParameter parameter) {
Class<?> paramType = parameter.getParameterType();
return (WebRequest.class.isAssignableFrom(paramType) ||
ServletRequest.class.isAssignableFrom(paramType) ||
MultipartRequest.class.isAssignableFrom(paramType) ||
HttpSession.class.isAssignableFrom(paramType) ||
(pushBuilder != null && pushBuilder.isAssignableFrom(paramType)) ||
(Principal.class.isAssignableFrom(paramType) && !parameter.hasParameterAnnotations()) ||
InputStream.class.isAssignableFrom(paramType) ||
Reader.class.isAssignableFrom(paramType) ||
HttpMethod.class == paramType ||
Locale.class == paramType ||
TimeZone.class == paramType ||
ZoneId.class == paramType);
}
3. 复杂函数
MapModel(map、model里面的数据会被放在 Request 的请求域request.setAttribute)Errors/BindingResultRedirectAttributes( 重定向携带数据)ServletResponse( Response )SessionStatusUriComponentsBuilderServletUriComponentsBuilder
com.yourname.boot.controller.RequestController.testParam()
@GetMapping(value = "/params")
public String testParam(Map<String, Object> map,
Model model,
HttpServletRequest request,
HttpServletResponse response) {
}
上面的 Map、Model、HttpServletRequest 都可以给 Request 域中存放数据
Map / Model 类型的参数会返回 macContainer.getModel() → BindingAwareModelMap 来获取值
org.springframework.web.method.support.ModelAndViewContainer
public class ModelAndViewContainer {
  private final ModelMap defaultModel = new BindingAwareModelMap();
}
由下图可知,Map(0)和 Model (1)类型都是由同一个对象(BindingAwareModelMap)来获取的

4. 自定义对象参数
可以自动类型转换与格式化,可以级联封装
示例代码:
index.html
<!DOCTYPE html>
<html lang="en">
<head>
<meta charset="UTF-8">
<title>Index</title>
<style type="text/css">
body {
font-family: Futura, "PingFang SC", Helvetica, Arial, sans-serif;
}
</style>
</head>
<body>
<h1>Welcome to index</h1>
测试封装POJO;
<form action="/saveuser" method="post">
姓名: <input name="userName" value="zhangsan"/> <br/>
年龄: <input name="age" value="18"/> <br/>
生日: <input name="birth" value="2019/12/10"/> <br/>
宠物姓名:<input name="pet.name" value="阿猫"/><br/>
宠物年龄:<input name="pet.age" value="5"/>
<input type="submit" value="保存"/>
</form>
<br>
</body>
</html>
com.yourname.boot.bean.Person
/**
* 姓名: <input name="userName"/> <br/>
* 年龄: <input name="age"/> <br/>
* 生日: <input name="birth"/> <br/>
* 宠物姓名:<input name="pet.name"/><br/>
* 宠物年龄:<input name="pet.age"/>
*/
@Data
public class Person {
private String userName;
private Integer age;
private Date birth;
private Pet pet;
}
com.yourname.boot.bean.Pet
@Data
public class Pet {
    private String name;
    private String age;
}
com.yourname.boot.controller.ParameterController
/**
 * @author gregPerlinLi
 * @since 2021-10-27
 */
@RestController
public class ParameterTestController {
    /**
     * Data binding: The data submitted by the page (GET, POST) can be bound to the object
     *
     * @param person person
     * @return person
     */
    @PostMapping(value = "/saveuser")
    public Person saveUser(Person person) {
        return person;
    }
}
3.3 POJO 封装过程
ServletModelAttributeMethodProcessor
HandlerMethodReturnValueHandler:处理返回值HandlerMethodArgumentResolver:处理参数
3.4. 参数处理原理
HandlerMapping中找到能处理请求的 Handler(Controller.method())- 为当前 Handler 找一个适配器
HandlerAdapter:RequestMappingHandlerAdapter - 适配器执行目标方法并确定方法参数的每一个值
1. HandlerAdapter

0:支持方法上标注@RequestMapping的适配器1:支持函数式编程的适配器- …
2. 执行目标方法
org.springframework.web.servlet.DispatcherServlet.doDispatch()
// Actually invoke the handler.
mv = ha.handle(processedRequest, response, mappedHandler.getHandler());
org.springframework.web.servlet.mvc.method.annotation.RequestMappingHandlerAdapter.handleInternal()
// Execute target method
mav = invokeHandlerMethod(request, response, handlerMethod);
org.springframework.web.servlet.mvc.method.annotation.ServletInvocableHandlerMethod.invokeAndHandle()
Object returnValue = invokeForRequest(webRequest, mavContainer, providedArgs);
org.springframework.web.method.support.InvocableHandlerMethod.invokeForRequest()
// 获取方法参数值
Object[] args = getMethodArgumentValues(request, mavContainer, providedArgs);
3. 参数解析器(HandlerMethodArgumentResolver)
确定我们将要执行的目标方法的每一个值
SpringMVC 目标方法能写多少种参数类型,取决于参数解析器

参数解析器的接口设计:

- 判断当前解析器是否支持解析这种参数
- 支持解析就调用
resolveArgument
4. 返回值处理器

5. 如何确定目标方法每一个参数值
org.springframework.web.method.support.InvocableHandlerMethod.getMethodArgumentValues()
/**
* Get the method argument values for the current request, checking the provided
* argument values and falling back to the configured argument resolvers.
* <p>The resulting array will be passed into {@link #doInvoke}.
* @since 5.1.2
*/
protected Object[] getMethodArgumentValues(NativeWebRequest request, @Nullable ModelAndViewContainer mavContainer,
Object... providedArgs) throws Exception {
MethodParameter[] parameters = getMethodParameters();
if (ObjectUtils.isEmpty(parameters)) {
return EMPTY_ARGS;
}
Object[] args = new Object[parameters.length];
for (int i = 0; i < parameters.length; i++) {
MethodParameter parameter = parameters[i];
parameter.initParameterNameDiscovery(this.parameterNameDiscoverer);
args[i] = findProvidedArgument(parameter, providedArgs);
if (args[i] != null) {
continue;
}
if (!this.resolvers.supportsParameter(parameter)) {
throw new IllegalStateException(formatArgumentError(parameter, "No suitable resolver"));
}
try {
args[i] = this.resolvers.resolveArgument(parameter, mavContainer, request, this.dataBinderFactory);
}
catch (Exception ex) {
// Leave stack trace for later, exception may actually be resolved and handled...
if (logger.isDebugEnabled()) {
String exMsg = ex.getMessage();
if (exMsg != null && !exMsg.contains(parameter.getExecutable().toGenericString())) {
logger.debug(formatArgumentError(parameter, exMsg));
}
}
throw ex;
}
}
return args;
}
5.1. 逐个判断参数解析器那个支持解析此参数
org.springframework.web.method.support.HandlerMethodArgumentResolverComposite.getArgumentResolver()
/**
 * Find a registered {@link HandlerMethodArgumentResolver} that supports
 * the given method parameter.
 */
@Nullable
private HandlerMethodArgumentResolver getArgumentResolver(MethodParameter parameter) {
    HandlerMethodArgumentResolver result = this.argumentResolverCache.get(parameter);
    if (result == null) {
        for (HandlerMethodArgumentResolver resolver : this.argumentResolvers) {
            if (resolver.supportsParameter(parameter)) {
                result = resolver;
                this.argumentResolverCache.put(parameter, result);
                break;
            }
        }
    }
    return result;
}
5.2. 解析这个参数的值
调用各自 HandlerMethodArgumentResolver 的 resolveArgument() 方法即可
5.3. 自定义类型参数封装 POJO
ServletModelAttributeMethodProcessor 参数处理器支持封装
判断是否为简单类型
org.springframework.beans.BeanUtils.isSimpleValueType()
/**
* Check if the given type represents a "simple" value type: a primitive or
* primitive wrapper, an enum, a String or other CharSequence, a Number, a
* Date, a Temporal, a URI, a URL, a Locale, or a Class.
* <p>{@code Void} and {@code void} are not considered simple value types.
* @param type the type to check
* @return whether the given type represents a "simple" value type
* @see #isSimpleProperty(Class)
*/
public static boolean isSimpleValueType(Class<?> type) {
return (Void.class != type && void.class != type &&
(ClassUtils.isPrimitiveOrWrapper(type) ||
Enum.class.isAssignableFrom(type) ||
CharSequence.class.isAssignableFrom(type) ||
Number.class.isAssignableFrom(type) ||
Date.class.isAssignableFrom(type) ||
Temporal.class.isAssignableFrom(type) ||
URI.class == type ||
URL.class == type ||
Locale.class == type ||
Class.class == type));
}
org.springframework.web.method.annotation.ModelAttributeMethodProcessor.resolveArgument()
/**
* Resolve the argument from the model or if not found instantiate it with
* its default if it is available. The model attribute is then populated
* with request values via data binding and optionally validated
* if {@code @java.validation.Valid} is present on the argument.
* @throws BindException if data binding and validation result in an error
* and the next method parameter is not of type {@link Errors}
* @throws Exception if WebDataBinder initialization fails
*/
@Override
@Nullable
public final Object resolveArgument(MethodParameter parameter, @Nullable ModelAndViewContainer mavContainer,
NativeWebRequest webRequest, @Nullable WebDataBinderFactory binderFactory) throws Exception {
Assert.state(mavContainer != null, "ModelAttributeMethodProcessor requires ModelAndViewContainer");
Assert.state(binderFactory != null, "ModelAttributeMethodProcessor requires WebDataBinderFactory");
String name = ModelFactory.getNameForParameter(parameter);
ModelAttribute ann = parameter.getParameterAnnotation(ModelAttribute.class);
if (ann != null) {
mavContainer.setBinding(name, ann.binding());
}
Object attribute = null;
BindingResult bindingResult = null;
if (mavContainer.containsAttribute(name)) {
attribute = mavContainer.getModel().get(name);
}
else {
// Create attribute instance
try {
attribute = createAttribute(name, parameter, binderFactory, webRequest);
}
catch (BindException ex) {
if (isBindExceptionRequired(parameter)) {
// No BindingResult parameter -> fail with BindException
throw ex;
}
// Otherwise, expose null/empty value and associated BindingResult
if (parameter.getParameterType() == Optional.class) {
attribute = Optional.empty();
}
else {
attribute = ex.getTarget();
}
bindingResult = ex.getBindingResult();
}
}
if (bindingResult == null) {
// Bean property binding and validation;
// skipped in case of binding failure on construction.
WebDataBinder binder = binderFactory.createBinder(webRequest, attribute, name);
if (binder.getTarget() != null) {
if (!mavContainer.isBindingDisabled(name)) {
bindRequestParameters(binder, webRequest);
}
validateIfApplicable(binder, parameter);
if (binder.getBindingResult().hasErrors() && isBindExceptionRequired(binder, parameter)) {
throw new BindException(binder.getBindingResult());
}
}
// Value type adaptation, also covering java.util.Optional
if (!parameter.getParameterType().isInstance(attribute)) {
attribute = binder.convertIfNecessary(binder.getTarget(), parameter.getParameterType(), parameter);
}
bindingResult = binder.getBindingResult();
}
// Add resolved attribute and BindingResult at the end of the model
Map<String, Object> bindingResultModel = bindingResult.getModel();
mavContainer.removeAttributes(bindingResultModel);
mavContainer.addAllAttributes(bindingResultModel);
return attribute;
}
创建 Web 数据绑定器:
WebDataBinder binder = binderFactory.createBinder(webRequest, attribute, name);WebDataBinder作用: 将请求参数的值绑定到指定的 JavaBean 中WebDataBinder利用其中的Convers将请求数据转换成指定的数据类型,然后再次封装到 Java Bean 中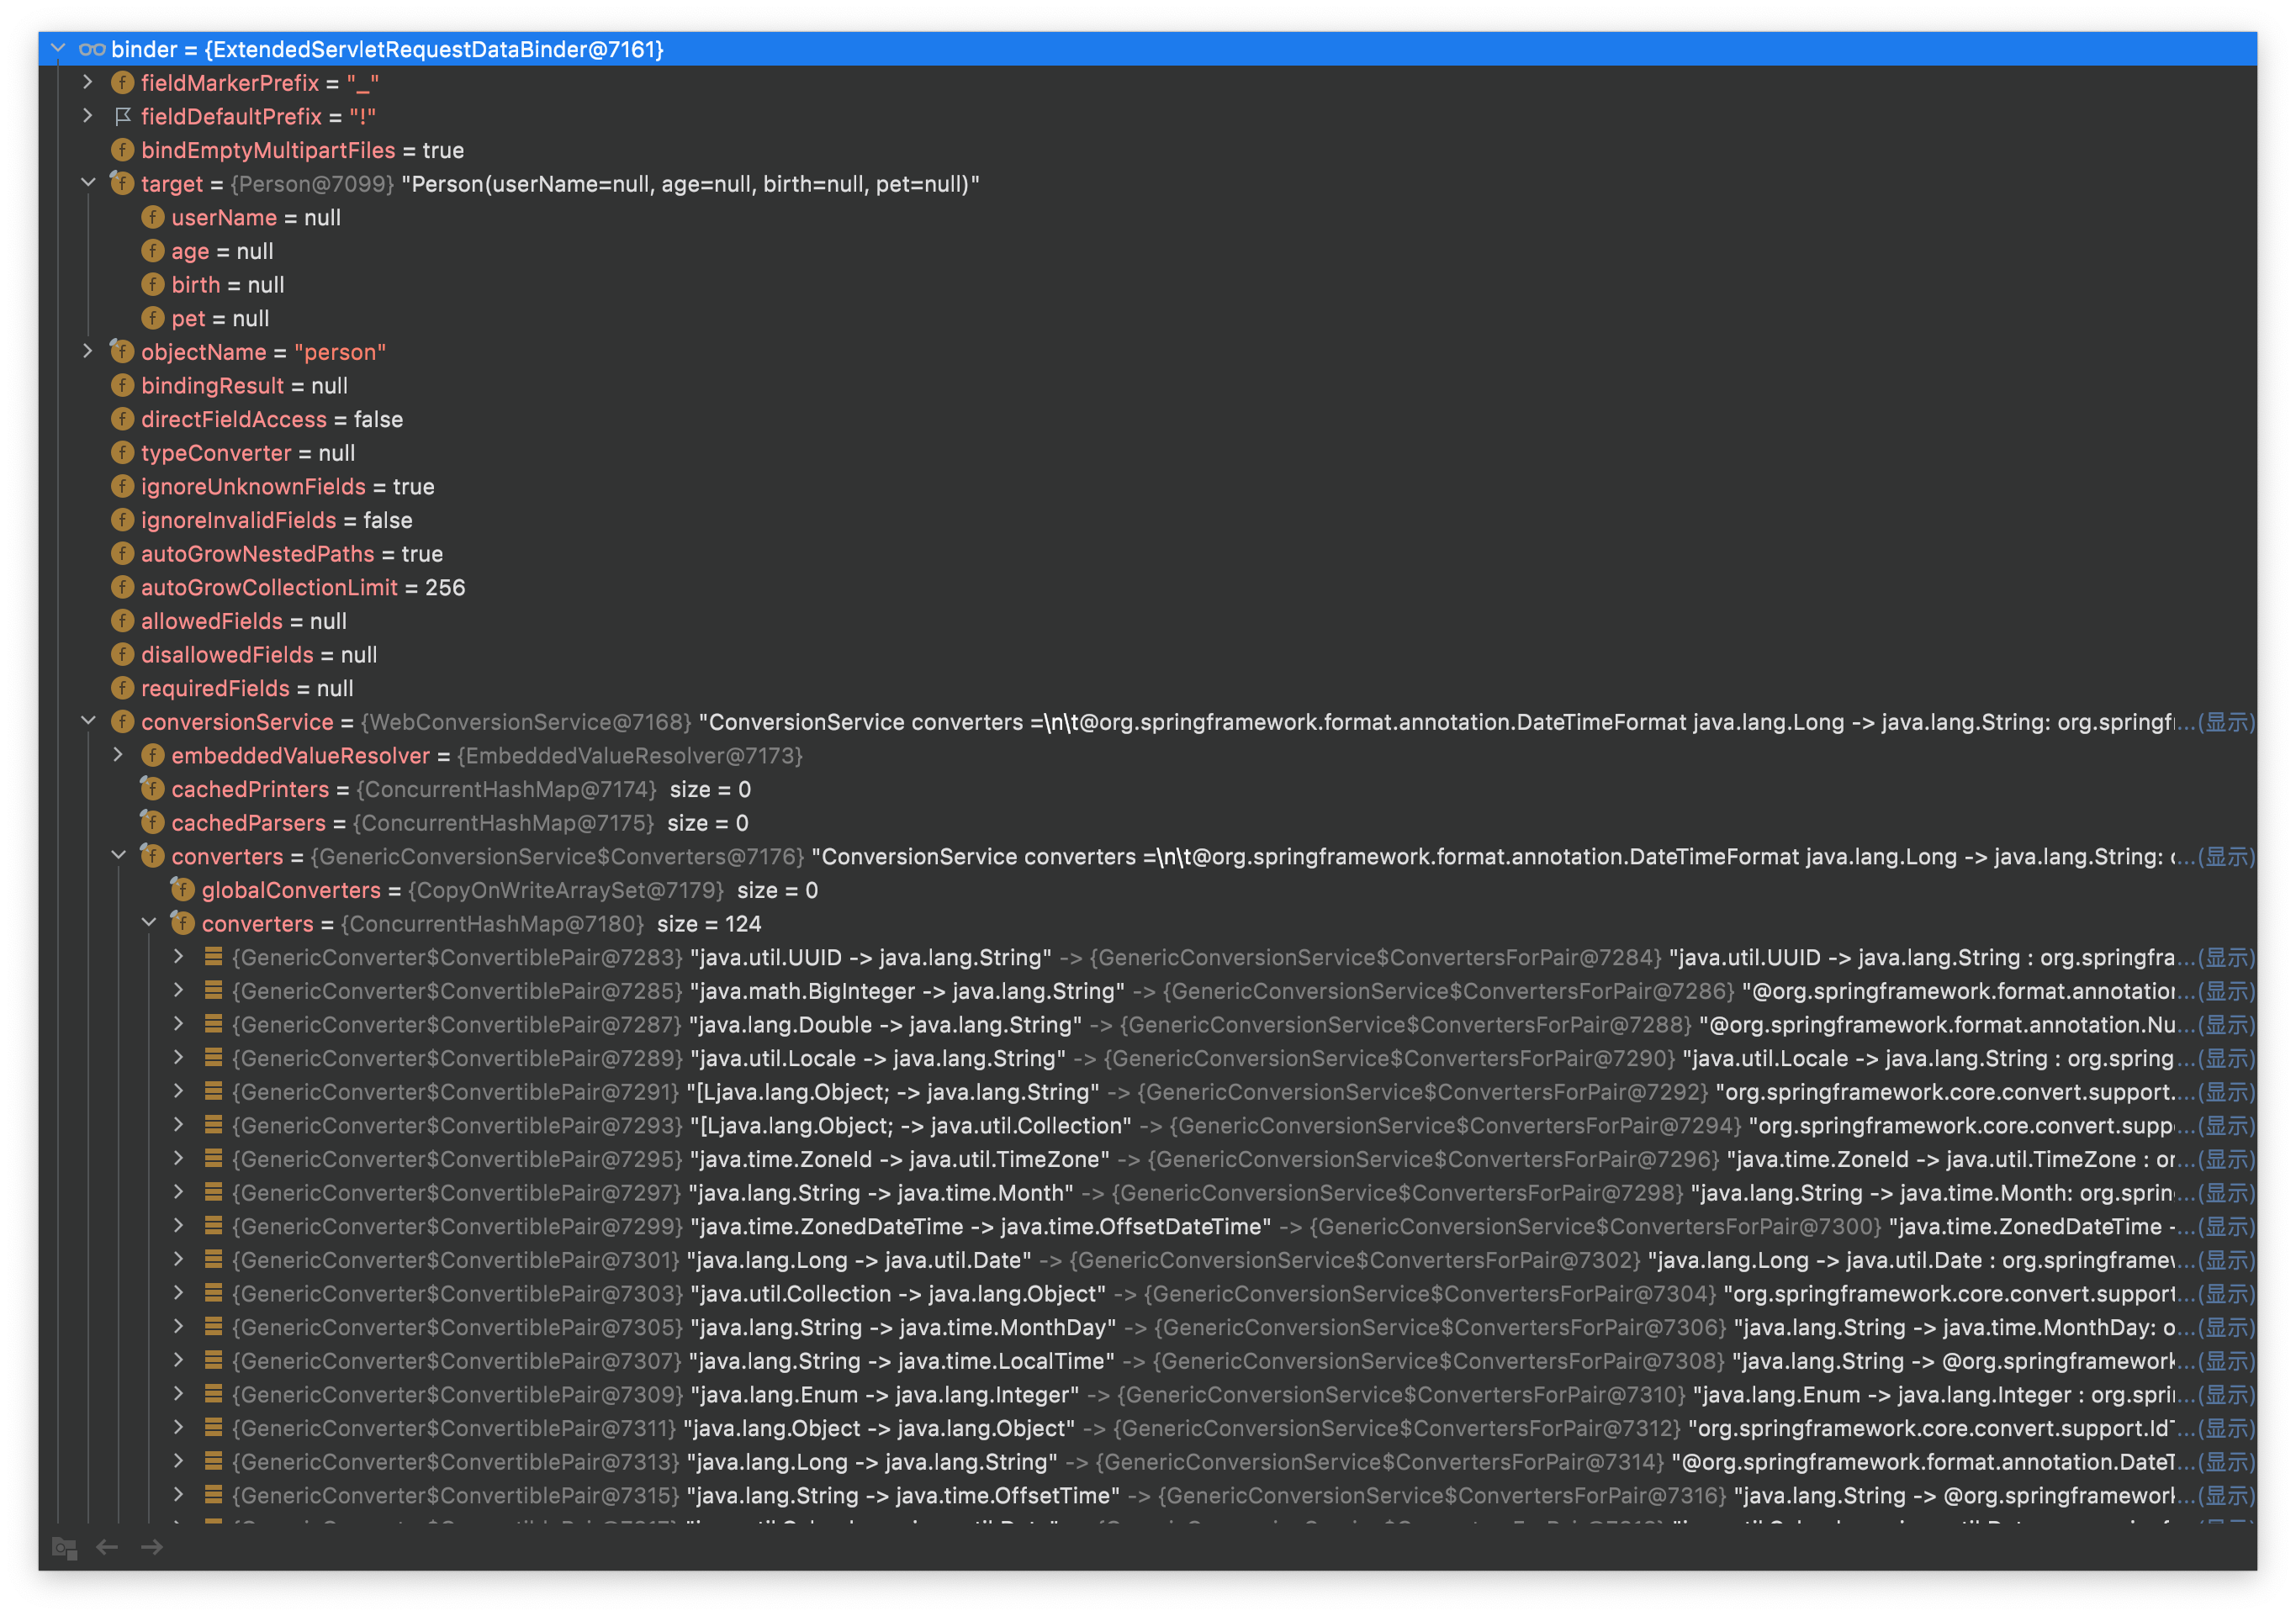
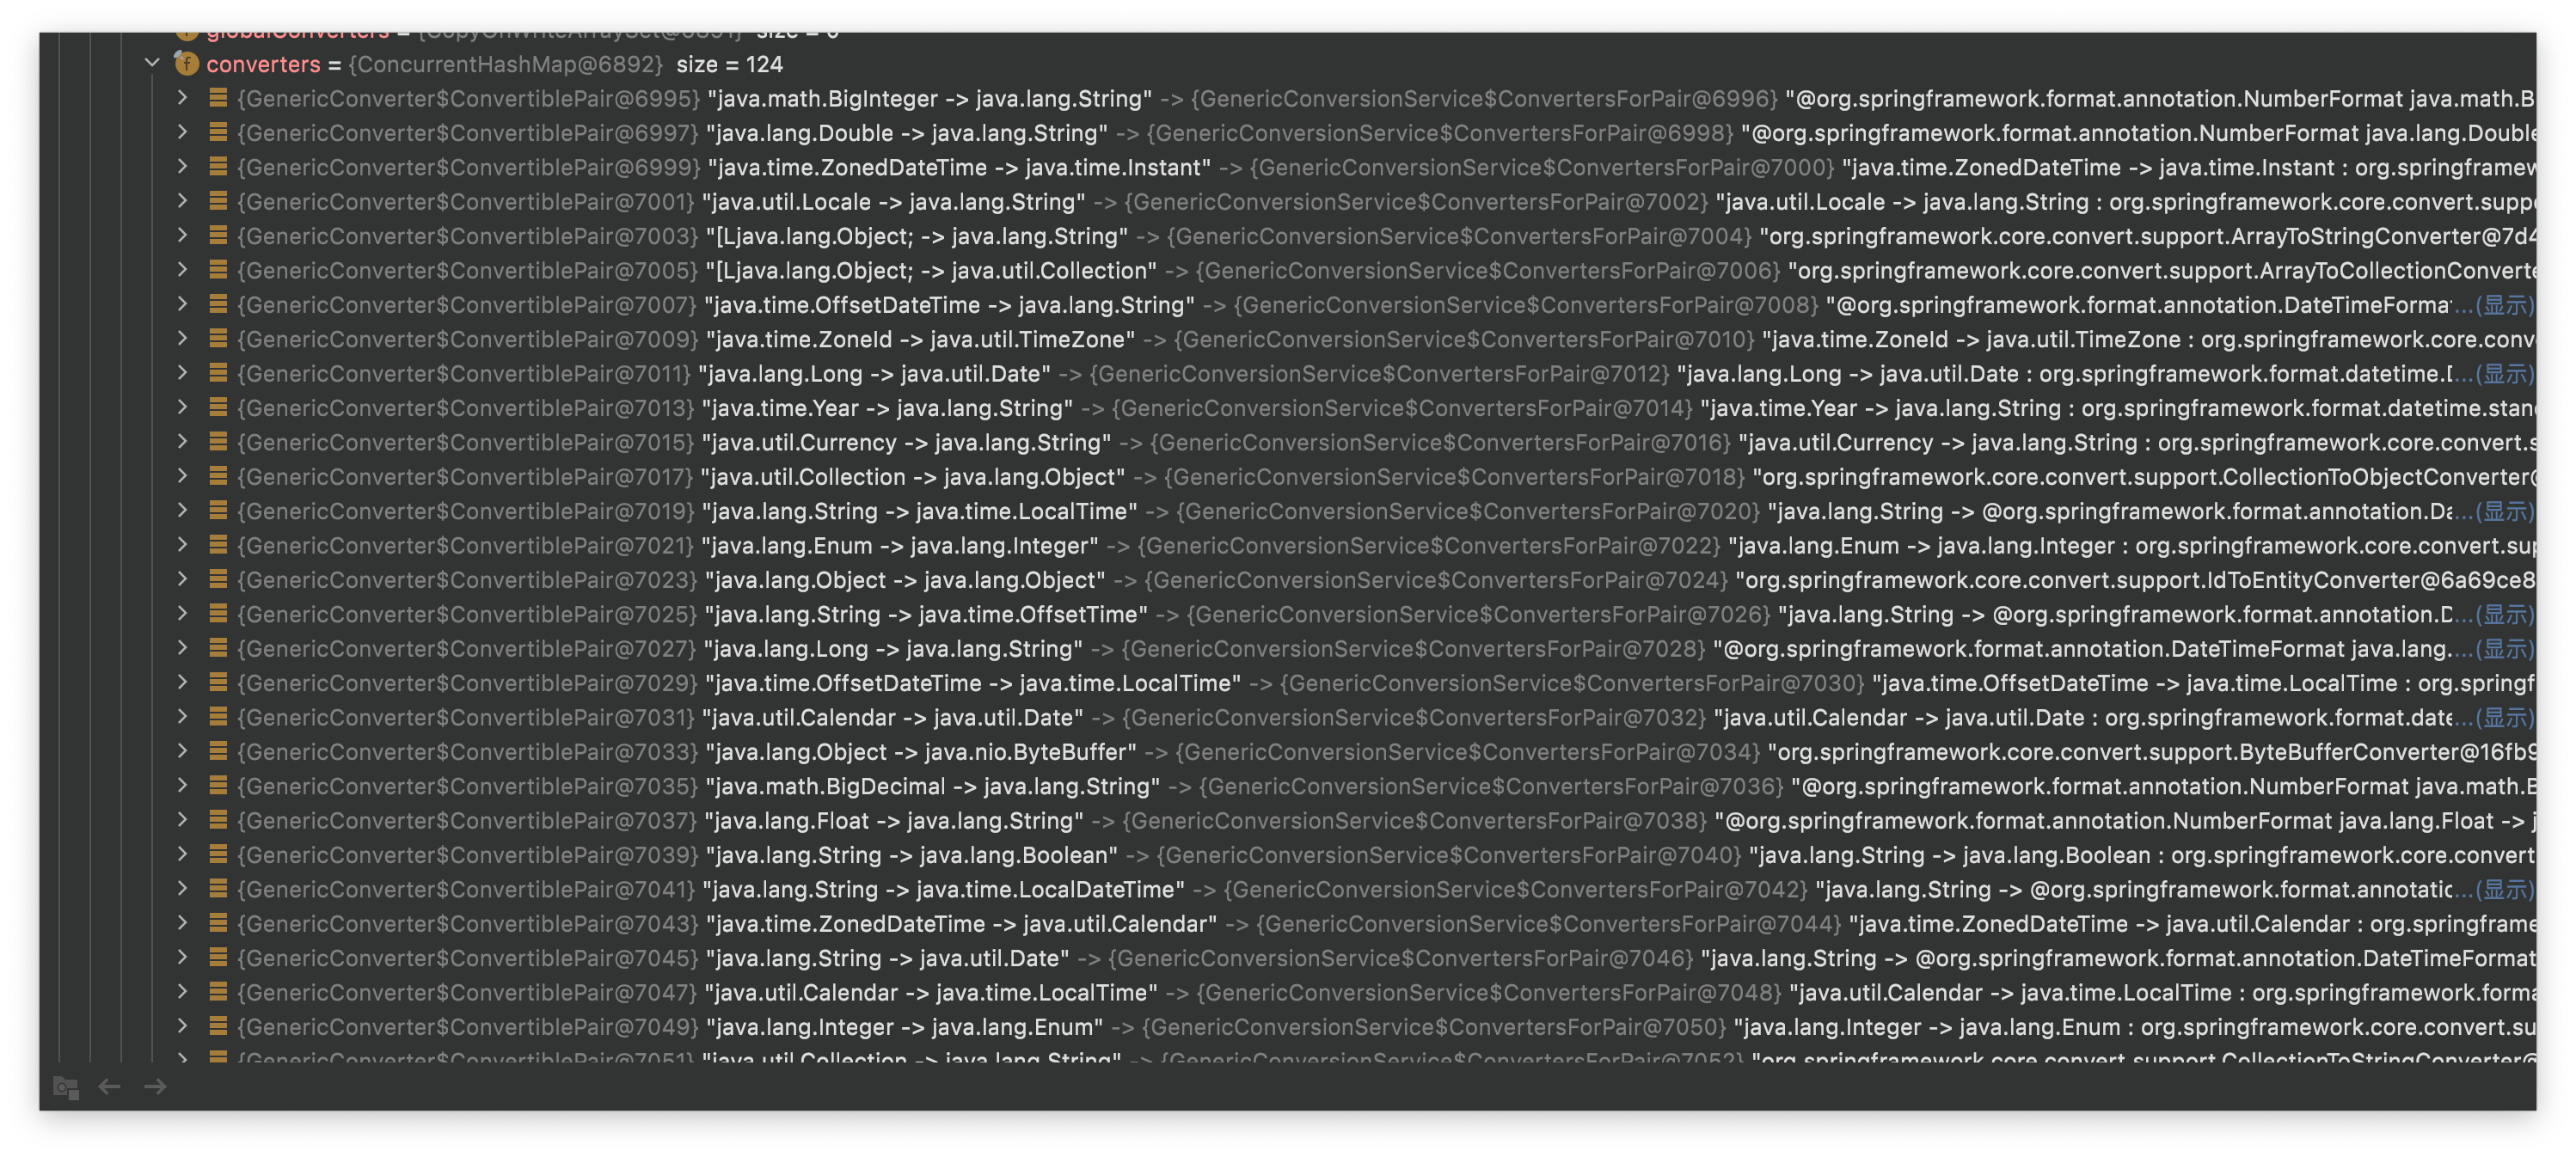
GenericConverterService: 在设置每一个值的时候,找其中所有的 Converter 哪个可以将这个数据(Request 带来的参数的字符串)转换到指定的类型(JavaBean 中定义的类型)
org.springframework.core.convert.support.GenericConversionService.find()
/**
* Find a {@link GenericConverter} given a source and target type.
* <p>This method will attempt to match all possible converters by working
* through the class and interface hierarchy of the types.
* @param sourceType the source type
* @param targetType the target type
* @return a matching {@link GenericConverter}, or {@code null} if none found
*/
@Nullable
public GenericConverter find(TypeDescriptor sourceType, TypeDescriptor targetType) {
// Search the full type hierarchy
List<Class<?>> sourceCandidates = getClassHierarchy(sourceType.getType());
List<Class<?>> targetCandidates = getClassHierarchy(targetType.getType());
for (Class<?> sourceCandidate : sourceCandidates) {
for (Class<?> targetCandidate : targetCandidates) {
ConvertiblePair convertiblePair = new ConvertiblePair(sourceCandidate, targetCandidate);
GenericConverter converter = getRegisteredConverter(sourceType, targetType, convertiblePair);
if (converter != null) {
return converter;
}
}
}
return null;
}
之后我们可以给 WebDataBinder 中定义自己的 Converter 从而实现将任意类型转换为自己想要的类型:
private static final class StringToNumber<T extends Number> implements Converter<String T> {
}
Converter 的总接口:
org.springframework.core.convert.converter.Converter
/**
* A converter converts a source object of type {@code S} to a target of type {@code T}.
*
* <p>Implementations of this interface are thread-safe and can be shared.
*
* <p>Implementations may additionally implement {@link ConditionalConverter}.
*
* @author Keith Donald
* @author Josh Cummings
* @since 3.0
* @param <S> the source type
* @param <T> the target type
*/
@FunctionalInterface
public interface Converter<S, T> {
/**
* Convert the source object of type {@code S} to target type {@code T}.
* @param source the source object to convert, which must be an instance of {@code S} (never {@code null})
* @return the converted object, which must be an instance of {@code T} (potentially {@code null})
* @throws IllegalArgumentException if the source cannot be converted to the desired target type
*/
@Nullable
T convert(S source);
/**
* Construct a composed {@link Converter} that first applies this {@link Converter}
* to its input, and then applies the {@code after} {@link Converter} to the
* result.
* @param after the {@link Converter} to apply after this {@link Converter}
* is applied
* @param <U> the type of output of both the {@code after} {@link Converter}
* and the composed {@link Converter}
* @return a composed {@link Converter} that first applies this {@link Converter}
* and then applies the {@code after} {@link Converter}
* @since 5.3
*/
default <U> Converter<S, U> andThen(Converter<? super T, ? extends U> after) {
Assert.notNull(after, "After Converter must not be null");
return (S s) -> {
T initialResult = convert(s);
return (initialResult != null ? after.convert(initialResult) : null);
};
}
}
自定义转换器示例:
index.html
<!DOCTYPE html>
<html lang="en">
<head>
<meta charset="UTF-8">
<title>Index</title>
<style type="text/css">
body {
font-family: Futura, "PingFang SC", Helvetica, Arial, sans-serif;
}
</style>
</head>
<body>
<h1>Welcome to index</h1>
测试封装POJO;
<form action="/saveuser" method="post">
姓名: <input name="userName" value="zhangsan"/> <br/>
年龄: <input name="age" value="18"/> <br/>
生日: <input name="birth" value="2019/12/10"/> <br/>
宠物: <input name="pet" value="啊猫,3"/>
<input type="submit" value="保存"/>
</form>
<br>
</body>
</html>
com.yourname.boot.config.WebConfig
/**
* Customize filter
*
* @author gregPerlinLi
* @since 2021-10-27
*/
@Configuration(proxyBeanMethods = false)
public class WebConfig {
/**
* WebMvcConfigure customizes SpringMVC functionality
*
* @return webMvcConfigure
*/
@Bean
public WebMvcConfigurer webMvcConfigurer() {
return new WebMvcConfigurer() {
@Override
public void addFormatters(FormatterRegistry registry) {
registry.addConverter(new Converter<String, Pet>() {
@Override
public Pet convert(String source) {
// Cat,3
if (!StringUtils.isEmpty(source)) {
Pet pet = new Pet();
String[] split = source.split(",");
pet.setName(split[0]);
pet.setAge(Integer.parseInt(split[1]));
return pet;
}
return null;
}
});
}
};
}
}
6. 目标方法执行完成
将所有的数据都放在 ModelAdnViewContainer 中。其中包含了要转发的页面地址 View,还包含 Model 数据

7. 处理派发结果
org.springframework.web.servlet.DispatcherServlet.doDispatch()
processDispatchResult(processedRequest, response, mappedHandler, mv, dispatchException);
org.springframework.web.servlet.view.AbstractView.render()
renderMergedOutputModel(mergedModel, getRequestToExpose(request), response);
org.springframework.web.servlet.view.InternalResourceView.renderMergedOutputModel()
/**
* Render the internal resource given the specified model.
* This includes setting the model as request attributes.
*/
@Override
protected void renderMergedOutputModel(
Map<String, Object> model, HttpServletRequest request, HttpServletResponse response) throws Exception {
// Expose the model object as request attributes.
exposeModelAsRequestAttributes(model, request);
// Expose helpers as request attributes, if any.
exposeHelpers(request);
// Determine the path for the request dispatcher.
String dispatcherPath = prepareForRendering(request, response);
// Obtain a RequestDispatcher for the target resource (typically a JSP).
RequestDispatcher rd = getRequestDispatcher(request, dispatcherPath);
if (rd == null) {
throw new ServletException("Could not get RequestDispatcher for [" + getUrl() +
"]: Check that the corresponding file exists within your web application archive!");
}
// If already included or response already committed, perform include, else forward.
if (useInclude(request, response)) {
response.setContentType(getContentType());
if (logger.isDebugEnabled()) {
logger.debug("Including [" + getUrl() + "]");
}
rd.include(request, response);
}
else {
// Note: The forwarded resource is supposed to determine the content type itself.
if (logger.isDebugEnabled()) {
logger.debug("Forwarding to [" + getUrl() + "]");
}
rd.forward(request, response);
}
}
暴露模型作为请求域属性:
// Expose the model object as request attributes. exposeModelAsRequestAttributes(model, request);org.springframework.web.servlet.view.InternalResourceView.exposeModelAsRequestAttributes()protected void exposeModelAsRequestAttributes(Map<String, Object> model, HttpServletRequest request) throws Exception { // Model 中的所有数据遍历放到请求域中 model.forEach((name, value) -> { if (value != null) { request.setAttribute(name, value); } else { request.removeAttribute(name); } }); }
4. 数据响应与内容协商
4.1. 响应 JSON
4.1.1. jsckson.jar + @ResponseBody
引入 starter-web 场景,其中已包含 starter-json 场景(使用 Jackson 作为框架)
pom.xml
<dependency>
    <groupId>org.springframework.boot</groupId>
    <artifactId>spring-boot-starter-web</artifactId>
</dependency>
spring-boot-starter-web.pom
<dependency>
  <groupId>org.springframework.boot</groupId>
  <artifactId>spring-boot-starter-json</artifactId>
  <version>2.5.6</version>
  <scope>compile</scope>
</dependency>
spring-boot-starter-json.pom
<dependency>
  <groupId>com.fasterxml.jackson.core</groupId>
  <artifactId>jackson-databind</artifactId>
  <version>2.12.5</version>
  <scope>compile</scope>
</dependency>
<dependency>
  <groupId>com.fasterxml.jackson.datatype</groupId>
  <artifactId>jackson-datatype-jdk8</artifactId>
  <version>2.12.5</version>
  <scope>compile</scope>
</dependency>
<dependency>
  <groupId>com.fasterxml.jackson.datatype</groupId>
  <artifactId>jackson-datatype-jsr310</artifactId>
  <version>2.12.5</version>
  <scope>compile</scope>
</dependency>
<dependency>
  <groupId>com.fasterxml.jackson.module</groupId>
  <artifactId>jackson-module-parameter-names</artifactId>
  <version>2.12.5</version>
  <scope>compile</scope>
</dependency>
示例代码:
com.yourname.boot.controller.ResponseTestController
@Controller
public class ResponseTestController {
    @ResponseBody
    @GetMapping(value = "/test/person")
    public Person getPerson() {
        Person person = new Person();
        person.setAge(28);
        person.setBirth(new Date());
        person.setUserName("XiaoMing");
        return person;
    }
}
1. 返回值解析器

org.springframework.web.servlet.mvc.method.annotation.ServletInvocableHandlerMethod.invokeAndHandle()
try {
    this.returnValueHandlers.handleReturnValue(
            returnValue, getReturnValueType(returnValue), mavContainer, webRequest);
}
org.springframework.web.method.support.HandlerMethodReturnValueHandlerComposite.handleReturnValue()
/**
 * Iterate over registered {@link HandlerMethodReturnValueHandler HandlerMethodReturnValueHandlers} and invoke the one that supports it.
 * @throws IllegalStateException if no suitable {@link HandlerMethodReturnValueHandler} is found.
 */
@Override
public void handleReturnValue(@Nullable Object returnValue, MethodParameter returnType,
        ModelAndViewContainer mavContainer, NativeWebRequest webRequest) throws Exception {

    HandlerMethodReturnValueHandler handler = selectHandler(returnValue, returnType);
    if (handler == null) {
        throw new IllegalArgumentException("Unknown return value type: " + returnType.getParameterType().getName());
    }
    handler.handleReturnValue(returnValue, returnType, mavContainer, webRequest);
}
返回值的处理:
org.springframework.web.servlet.mvc.method.annotation.RequestResponseBodyMethodProcessor.handleReturnValue()
@Override
public void handleReturnValue(@Nullable Object returnValue, MethodParameter returnType,
        ModelAndViewContainer mavContainer, NativeWebRequest webRequest)
        throws IOException, HttpMediaTypeNotAcceptableException, HttpMessageNotWritableException {

    mavContainer.setRequestHandled(true);
    ServletServerHttpRequest inputMessage = createInputMessage(webRequest);
    ServletServerHttpResponse outputMessage = createOutputMessage(webRequest);

    // Try even with null return value. ResponseBodyAdvice could get involved.
  // 使用消息转换器进行写出操作
    writeWithMessageConverters(returnValue, returnType, inputMessage, outputMessage);
}
2. 返回值解析器原理

- 返回值处理器判断是否支持这种类型返回值
supportsReturnType - 返回值处理器调用
handleReturnValue进行处理 RequestResponseBodyMethodProcessor可以处理返回值标注@ResponseBody注解的方法- 利用
MessageConverters进行处理 将数据写为 JSON- 内容协商(浏览器默认会以请求头的方式告诉服务器能接受什么样的内容类型)
- 服务器最终根据自己自身的能力,决定服务器能生产出什么样内容类型的数据
- SpringMVC 会挨个遍历所有容器底层的
HttpMessageConverter,看谁能处理- 得到
MappingJackson2HttpMessageConverter可以将对象写为 JSON - 利用
MappingJackson2HttpMessageConverter将对象转为 JSON 再写出去
- 得到
- 利用
请求头:

- Accept:浏览器能接受的内容类型(
q为权重,值越大优先度越高)
4.1.2. SpringMVC 支持的返回值
ModelAndViewModelViewResponseEntityResponseBodyEmitterStreamingResponseBodyHttpEntityHttpHeadersCallableDeferredResultListenableFutureCompletionStageWebAsyncTask- 有
@ModelAttribute且为对象类型 @ResponseBody注解 →RequestResponseBodyMethodProcessor
4.1.3. HTTPMessageConverter 原理
1. MessageConverter 规范

HttpMessageConverter 判断是否支持将提供的 Class 类型的对象转换为 MediaType 类型的数据
例如:将 Person 对象转换为 JSON 数据,或者是将 JSON 数据转换为 Person 对象
2. 系统中默认的 MessageConverter

0:只支持Byte类型的1:只支持String类型的2:只支持String类型的3:只支持Resource类型的4:只支持ResourceRegion类型的5:只支持如下Source类型:DOMSource.class、SAXSource.class、StAXSource.class、StreamSource.class、Source.class6:只支持MultiValueMap类型的7:true8:true
最终 MappingJackson2HttpMessageConverter 将对象转换为 JSON 数据(利用底层的 Jackson 的 objectMapper 转换)

4.2. 内容协商
根据客户端接收能力不同,返回不同媒体类型的数据
4.2.1. 引入 XML 的 Maven 依赖坐标
<dependency>
        <groupId>com.fasterxml.jackson.dataformat</groupId>
        <artifactId>jackson-dataformat-xml</artifactId>
</dependency>
4.2.2. Postman / Apifox 分别测试返回 JSON 和 XML
改变请求头中 Accept 字段,用于告诉服务器本客户端可以接受的数据类型
JSON:

XML:

4.2.3. 开启浏览器参数方式内容协商功能
为了方便内容协商,开启基于请求参数的内容协商功能:
application.yaml
spring:
  mvc:
    contentnegotiation:
      favor-parameter: true  #开启请求参数内容协商模式
发送请求:
http://localhost:8080/test/person?format=json
http://localhost:8080/test/person?format=xml

确定客户端接收什么样的内容类型;
Parameter 策略优先确定是要返回 JSON数据(获取请求头中的
format的值)org.springframework.web.accept.ParameterContentNegotiationStrategy.getMediaTypeKey()@Override @Nullable protected String getMediaTypeKey(NativeWebRequest request) { return request.getParameter(getParameterName()); }最终进行内容协商返回给客户端 JSON 即可
4.2.4. 内容协商原理
判断当前响应头中是否已经有确定的媒体类型
MediaType获取客户端(Postman / Apifox、浏览器)支持接收的内容类型(获取客户端
Accept请求头字段:application/xml或者是application/json)
contentNegotiationManager内容协商管理器,默认使用基于请求头的策略

HeaderContentNegotiationStrategy确定客户端可以接受的内容类型org.springframework.web.accept.HeaderContentNegotiationStrategy.resolveMediaTypes()
String[] headerValueArray = request.getHeaderValues(HttpHeaders.ACCEPT);
if (headerValueArray == null) {
    return MEDIA_TYPE_ALL_LIST;
}
遍历循环所有当前系统的
MessageConverter,看其中哪个支持操作该对象(Person)
找到支持操作
Person的Converter支持的媒体类型统计出来客户端需要
application/xml,服务端能力【10种、JSON、XML】
进行内容协商的最佳匹配
org.springframework.web.servlet.mvc.method.annotation.AbstractMessageConverterMethodProcessor.writeWithMessageConverters()for (MediaType requestedType : acceptableTypes) { for (MediaType producibleType : producibleTypes) { if (requestedType.isCompatibleWith(producibleType)) { mediaTypesToUse.add(getMostSpecificMediaType(requestedType, producibleType)); } } }用支持将对象转为最佳匹配媒体类型的
Converter,并调用其进行转化 (当导入了 Jackson 处理 XML 的包之后,XML 的Converter就会自动加入进来)
导入了 Jackson 处理的 XML 的包,XML 的 Converter 就会自动导入进来
org.springframework.web.servlet.config.annotation.WebMvcConfigurationSupport
static {
    ClassLoader classLoader = WebMvcConfigurationSupport.class.getClassLoader();
    romePresent = ClassUtils.isPresent("com.rometools.rome.feed.WireFeed", classLoader);
    jaxb2Present = ClassUtils.isPresent("javax.xml.bind.Binder", classLoader);
    jackson2Present = ClassUtils.isPresent("com.fasterxml.jackson.databind.ObjectMapper", classLoader) &&
            ClassUtils.isPresent("com.fasterxml.jackson.core.JsonGenerator", classLoader);
    jackson2XmlPresent = ClassUtils.isPresent("com.fasterxml.jackson.dataformat.xml.XmlMapper", classLoader);
    jackson2SmilePresent = ClassUtils.isPresent("com.fasterxml.jackson.dataformat.smile.SmileFactory", classLoader);
    jackson2CborPresent = ClassUtils.isPresent("com.fasterxml.jackson.dataformat.cbor.CBORFactory", classLoader);
    gsonPresent = ClassUtils.isPresent("com.google.gson.Gson", classLoader);
    jsonbPresent = ClassUtils.isPresent("javax.json.bind.Jsonb", classLoader);
    kotlinSerializationJsonPresent = ClassUtils.isPresent("kotlinx.serialization.json.Json", classLoader);
}
org.springframework.web.servlet.config.annotation.WebMvcConfigurationSupport.addDefaultHttpMessageConverters()
if (!shouldIgnoreXml) {
    if (jackson2XmlPresent) {
        Jackson2ObjectMapperBuilder builder = Jackson2ObjectMapperBuilder.xml();
        if (this.applicationContext != null) {
            builder.applicationContext(this.applicationContext);
        }
        messageConverters.add(new MappingJackson2XmlHttpMessageConverter(builder.build()));
    }
    else if (jaxb2Present) {
        messageConverters.add(new Jaxb2RootElementHttpMessageConverter());
    }
}
4.2.5. 自定义 MessageConverter
实现多协议数据兼容 JSON、XML、X-CUSTOM(自定义协议)
@ResponseBody响应数据出去调用RequestResponseBodyMethodProcessor处理Processor处理方法返回值。通过MessageConverter处理- 所有
MessageConverter合起来可以支持各种媒体类型数据的操作(读、写) - 内容协商找到最终的
MessageConverter
无论是要改 SpringMVC 的什么功能,均从一个入口给容器中添加一个 WebMvcConfigurer
@Bean
public WebMvcConfigurer webMvcConfigurer() {
return new WebMvcConfigurer() {
@Override
public void extendMessageConverters(List<HttpMessageConverter<?>> converters) {
}
};
}
适配浏览器的参数方式内容协商功能:
原有的策略只包含了 XML 和 JSON 的

在适配之后,strategy 的 MediaTypes 中出现了 X-CUSTOM 协议

示例代码:
com.yourname.boot.config.WebConfig
/**
* Customize filter
*
* @author gregPerlinLi
* @since 2021-10-27
*/
@Configuration(proxyBeanMethods = false)
public class WebConfig {
@Bean
public HiddenHttpMethodFilter hiddenHttpMethodFilter(){
HiddenHttpMethodFilter methodFilter = new HiddenHttpMethodFilter();
methodFilter.setMethodParam("_m");
return methodFilter;
}
/**
* WebMvcConfigure customizes SpringMVC functionality
*
* @return webMvcConfigure
*/
@Bean
public WebMvcConfigurer webMvcConfigurer() {
return new WebMvcConfigurer() {
@Override
public void extendMessageConverters(List<HttpMessageConverter<?>> converters) {
converters.add(new CustomMessageConverter());
}
/**
* Custom content negotiation policy
*
* @param configurer configurer
*/
@Override
public void configureContentNegotiation(ContentNegotiationConfigurer configurer) {
// Map<String, MediaType> mediaTypes
Map<String, MediaType> mediaTypes = new HashMap<>(1000);
mediaTypes.put("json", MediaType.APPLICATION_JSON);
mediaTypes.put("xml", MediaType.APPLICATION_XML);
mediaTypes.put("custom", MediaType.parseMediaType("application/x-custom"));
// Specify which media types correspond to which parameters support resolution
ParameterContentNegotiationStrategy parameterStrategy = new ParameterContentNegotiationStrategy(mediaTypes);
HeaderContentNegotiationStrategy headerStrategy = new HeaderContentNegotiationStrategy();
configurer.strategies(Arrays.asList(parameterStrategy, headerStrategy));
}
};
}
}
com.yourname.boot.converter.CustomMessageConverter
/**
* Customize converter
*
* @author gregPerlinLi
* @since 2021-11-02
*/
public class CustomMessageConverter implements HttpMessageConverter<Person> {
@Override
public List<MediaType> getSupportedMediaTypes(Class<?> clazz) {
return HttpMessageConverter.super.getSupportedMediaTypes(clazz);
}
@Override
public boolean canRead(Class<?> clazz, MediaType mediaType) {
return false;
}
@Override
public boolean canWrite(Class<?> clazz, MediaType mediaType) {
return clazz.isAssignableFrom(Person.class);
}
/**
* The server needs to count what content types can be written out by all MessageConverters<br/>
* application/x-custom
*
* @return MediaType list
*/
@Override
public List<MediaType> getSupportedMediaTypes() {
return MediaType.parseMediaTypes("application/x-custom");
}
@Override
public Person read(Class<? extends Person> clazz, HttpInputMessage inputMessage) throws IOException, HttpMessageNotReadableException {
return null;
}
@Override
public void write(Person person, MediaType contentType, HttpOutputMessage outputMessage) throws IOException, HttpMessageNotWritableException {
// Custom data write out
String data = person.getUserName() + ";" +
person.getAge() + ";" +
person.getBirth() + ";" +
person.getPet() + ";";
// Write out
OutputStream body = outputMessage.getBody();
body.write(data.getBytes(StandardCharsets.UTF_8));
}
}
注意⚠️:添加的自定义功能可能会覆盖很多原有的功能,导致一些默认的功能失效!
5. 视图解析与模版解析
视图解析: SpringBoot 默认 不支持 JSP,需要引入第三方模版引擎技术实现页面渲染
5.1. 视图解析
视图解析原理流程
- 目标方法处理的过程中,所有数据都会被放在
ModelAndViewContainer里面,包括数据和视图地址 - 方法的参数是一个自定义类型对象(从请求参数中确定的),把他重新放在
ModelAndViewContainer中 - 任何目标方法执行完成以后都会返回
ModelAndView(数据和视图地址) ProcessDispatchResult处理派发结果(页面改如何响应)
render**(**mv, request, response);的页面渲染逻辑根据方法的 String 返回值得到
View对象(定义了页面的渲染逻辑)所有的视图解析器尝试是否能根据当前返回值得到
View对象
得到了
redirect:/main.html→ 在Thymeleaf中new RedirectView()ContentNegotiationViewResolver里包含了上图中所有的视图解析器,内部还是利用其得到视图对象
view.render(mv.getModelInternal(), request, response);视图对象调用自定义的Render进行页面渲染工作
RedirectView如何渲染(重定向到一个页面)- 获取目标 URL 地址
response.sendRedirect(encodedURL);
视图解析:
- 返回值以
forward:开始:new InternalResourceView(forwardUrl);→ 转发request.getRequestDispatcher(path).forward(request, response); - 返回值以
redirect:开始:new RedirectView();→Render就是重定向 - 返回值是普通字符串:
new ThymeleafView()→ 渲染
5.2. 模版引擎——Thymeleaf
5.2.1. Thymeleaf 简介
Thymeleaf is a modern server-side Java template engine for both web and standalone environments, capable of processing HTML, XML, JavaScript, CSS and even plain text.
现代化、服务端Java模板引擎
5.2.2. 基本语法
1. 表达式
| 表达式名字 | 语法 | 用途 |
|---|---|---|
| 变量取值 | ${...} |
获取请求域、Session 域、对象等值 |
| 选择变量 | *{...} |
获取上下文对象值 |
| 消息 | #{...} |
获取国际化等值 |
| 链接 | @{...} |
生成链接 |
| 片段表达式 | ~{...} |
jsp:include 作用,引入公共页面片段 |
2. 字面量
- 文本值:
'one text'、'Another one!'、… - 数字:
0、34、3.0、12.3、… - 布尔值:
true、false - 空值:
null - 变量:
one、two、…. 注意⚠️:变量不能有空格
3. 文本操作
- 字符串拼接:
+ - 变量替换:
|The name is ${name}|
4. 数学运算
- 运算符:
+、-、*、/、%
5、布尔运算
- 运算符:
and、or - 一元运算:
!、not
6、比较运算
- 比较:
>、<、>=、<=(gt、lt、ge、le) - 等式:
==、!=(eq、ne)
7、条件运算
If-then: (if) ? (then)If-then-else: (if) ? (then) : (else)Default: (value) ?: (defaultvalue)
8、特殊操作
- 无操作:
_
5.2.3. 设置属性值—th:attr
1. 设置单个值
<form action="subscribe.html" th:attr="action=@{/subscribe}">
<fieldset>
<input type="text" name="email" />
<input type="submit" value="Subscribe!" th:attr="value=#{subscribe.submit}"/>
</fieldset>
</form>
2. 设置多个值
<img src="../../images/gtvglogo.png" th:attr="src=@{/images/gtvglogo.png},title=#{logo},alt=#{logo}" />
3. 通用写法 th:xxx
<input type="submit" value="Subscribe!" th:value="#{subscribe.submit}"/>
<form action="subscribe.html" th:action="@{/subscribe}">
4. 所有兼容 HTML5 的标签写法
https://www.thymeleaf.org/doc/tutorials/3.0/usingthymeleaf.html#setting-value-to-specific-attributes
5.2.4. 迭代
<tr th:each="prod : ${prods}">
<td th:text="${prod.name}">Onions</td>
<td th:text="${prod.price}">2.41</td>
<td th:text="${prod.inStock}? #{true} : #{false}">yes</td>
</tr>
<tr th:each="prod,iterStat : ${prods}" th:class="${iterStat.odd}? 'odd'">
<td th:text="${prod.name}">Onions</td>
<td th:text="${prod.price}">2.41</td>
<td th:text="${prod.inStock}? #{true} : #{false}">yes</td>
</tr>
5.2.5. 条件运算
<a href="comments.html"
th:href="@{/product/comments(prodId=${prod.id})}"
th:if="${not #lists.isEmpty(prod.comments)}">view</a>
<div th:switch="${user.role}">
<p th:case="'admin'">User is an administrator</p>
<p th:case="#{roles.manager}">User is a manager</p>
<p th:case="*">User is some other thing</p>
</div>
5.2.6. 属性优先级
| Order | Feature | Attribute |
|---|---|---|
| 1 | Fragment inclusion | th:insertth:replace |
| 2 | Fragment iteration | th:each |
| 3 | Conditional evaluation | th:ifth:unlessth:switchth:case |
| 4 | Local variable definition | th:objectth:with |
| 5 | General attribute modification | th:attrth:attrprependth:attrappend |
| 6 | Specific attribute modification | th:valueth:hrefth:src… |
| 7 | Text (Tag body modification) | th:textth:utext |
| 8 | Fragment specification | th:fragment |
| 9 | Fragment removal | th:remove |
5.3. Thymeleaf 使用
1. 引入 Starter
pom.xml
<dependency>
    <groupId>org.springframework.boot</groupId>
    <artifactId>spring-boot-starter-thymeleaf</artifactId>
</dependency>
2. 自动配置 Thymeleaf
org.springframework.boot.autoconfigure.thymeleaf.ThymeleafAutoConfiguration
/**
 * {@link EnableAutoConfiguration Auto-configuration} for Thymeleaf.
 *
 * @author Dave Syer
 * @author Andy Wilkinson
 * @author Stephane Nicoll
 * @author Brian Clozel
 * @author Eddú Meléndez
 * @author Daniel Fernández
 * @author Kazuki Shimizu
 * @author Artsiom Yudovin
 * @since 1.0.0
 */
@Configuration(proxyBeanMethods = false)
@EnableConfigurationProperties(ThymeleafProperties.class)
@ConditionalOnClass({ TemplateMode.class, SpringTemplateEngine.class })
@AutoConfigureAfter({ WebMvcAutoConfiguration.class, WebFluxAutoConfiguration.class })
public class ThymeleafAutoConfiguration {

}
自动配置的策略:
- 所有 Thymeleaf 的配置值都在
ThymeleafProperties中 - 自动配置
SpringTemplateEngine - 自动配置
ThymeleafViewResolver - 我们只需要直接开发页面即可
3. 页面开发
success.html
<!DOCTYPE html>
<html lang="en" xmlns:th="http://www.thymeleaf.org" >
<head>
<meta charset="UTF-8">
<title>Success</title>
<style type="text/css">
body {
font-family: Futura, "PingFang SC", Helvetica, Arial, sans-serif;
}
</style>
</head>
<body>
<h1 th:text="${msg}">Haha</h1>
<h2>
<a href="https://forum.gdutelc.com" th:href="${link}">Go to baidu.com</a><br/>
<a href="https://forum.gdutelc.com" th:href="@{link}">Go to baidu.com</a>
</h2>
</body>
</html>
com.yourname.boot.controller.ViewTestController
/**
 * @author gregPerlinLi
 * @since 2021-11-03
 */
@Controller
public class ViewTestController {
    @GetMapping(value = "/hello")
    public String hello(Model model) {
        // The data in the model is placed in the request field request.setAttribute("a", aa)
        model.addAttribute("msg", "Hello world!");
        model.addAttribute("link", "https://www.baidu.com");
        return "success";
    }
}
4. 如何给项目加上访问前置路径
application.yaml
server:
  servlet:
    context-path: /world
- 配置之前的访问路径:
http://ip:port - 配置之后的访问路径:
http://ip:port/world
6. 拦截器
6.1. HandlerInterceptor 接口
com.yourname.adminserver.intercepter.LoginInterceptor
/**
* Login check<br/>
* 1. Configure the interceptor to intercept those requests<br/>
* 2. Put these configurations in a container<br/>
*
* @author gregPerlinLi
* @since 2021-11-03
*/
@Slf4j
public class LoginInterceptor implements HandlerInterceptor {
/**
* Interception point before the execution of a handler. Called after
* HandlerMapping determined an appropriate handler object, but before
* HandlerAdapter invokes the handler.
* <p>DispatcherServlet processes a handler in an execution chain, consisting
* of any number of interceptors, with the handler itself at the end.
* With this method, each interceptor can decide to abort the execution chain,
* typically sending an HTTP error or writing a custom response.
* <p><strong>Note:</strong> special considerations apply for asynchronous
* request processing. For more details see
* {@link AsyncHandlerInterceptor}.
* <p>The default implementation returns {@code true}.
*
* @param request current HTTP request
* @param response current HTTP response
* @param handler chosen handler to execute, for type and/or instance evaluation
* @return {@code true} if the execution chain should proceed with the
* next interceptor or the handler itself. Else, DispatcherServlet assumes
* that this interceptor has already dealt with the response itself.
* @throws Exception in case of errors
*/
@Override
public boolean preHandle(HttpServletRequest request, HttpServletResponse response, Object handler) throws Exception {
log.info("Current method is: preHandle");
String requestURI = request.getRequestURI();
log.info("The intercepted request path is: " + requestURI );
// Login check logic
HttpSession session = request.getSession();
Object loginUser = session.getAttribute("loginUser");
if ( loginUser != null ) {
// Release
return true;
}
// Intercept, not logged in, jump to login page
request.setAttribute("msg", "Please log in first!");
request.getRequestDispatcher("/").forward(request, response);
return false;
}
/**
* Interception point after successful execution of a handler.
* Called after HandlerAdapter actually invoked the handler, but before the
* DispatcherServlet renders the view. Can expose additional model objects
* to the view via the given ModelAndView.
* <p>DispatcherServlet processes a handler in an execution chain, consisting
* of any number of interceptors, with the handler itself at the end.
* With this method, each interceptor can post-process an execution,
* getting applied in inverse order of the execution chain.
* <p><strong>Note:</strong> special considerations apply for asynchronous
* request processing. For more details see
* {@link AsyncHandlerInterceptor}.
* <p>The default implementation is empty.
*
* @param request current HTTP request
* @param response current HTTP response
* @param handler the handler (or {@link org.springframework.web.method.HandlerMethod}) that started asynchronous
* execution, for type and/or instance examination
* @param modelAndView the {@code ModelAndView} that the handler returned
* (can also be {@code null})
* @throws Exception in case of errors
*/
@Override
public void postHandle(HttpServletRequest request, HttpServletResponse response, Object handler, ModelAndView modelAndView) throws Exception {
log.info("Current method is: postHandle " + modelAndView);
}
/**
* Callback after completion of request processing, that is, after rendering
* the view. Will be called on any outcome of handler execution, thus allows
* for proper resource cleanup.
* <p>Note: Will only be called if this interceptor's {@code preHandle}
* method has successfully completed and returned {@code true}!
* <p>As with the {@code postHandle} method, the method will be invoked on each
* interceptor in the chain in reverse order, so the first interceptor will be
* the last to be invoked.
* <p><strong>Note:</strong> special considerations apply for asynchronous
* request processing. For more details see
* {@link AsyncHandlerInterceptor}.
* <p>The default implementation is empty.
*
* @param request current HTTP request
* @param response current HTTP response
* @param handler the handler (or {@link org.springframework.web.method.HandlerMethod}) that started asynchronous
* execution, for type and/or instance examination
* @param ex any exception thrown on handler execution, if any; this does not
* include exceptions that have been handled through an exception resolver
* @throws Exception in case of errors
*/
@Override
public void afterCompletion(HttpServletRequest request, HttpServletResponse response, Object handler, Exception ex) throws Exception {
log.info("Current method is: afterCompletion " + ex);
}
}
6.2. 配置拦截器
com.yourname.adminserver.config.AdminWebConfig
/**
* 1. Write an interceptor to implement the <code>HandlerInterceptor</code> interface<br/>
* 2. The interceptor is registered in the container (realization <code>WebMvcConfigurer.addInterceptors()</code>)<br/>
* 3. Specify interception rules (If all resources are intercepted, static resources will also be intercepted)
*
* @author gregPerlinLi
* @since 2021-11-03
*/
@Configuration
public class AdminWebConfig implements WebMvcConfigurer {
@Override
public void addInterceptors(InterceptorRegistry registry) {
registry.addInterceptor(new LoginInterceptor())
// All requests will be blocked, including static resources are also blocked
.addPathPatterns("/**")
// Request for release
.excludePathPatterns("/", "/login", "/css/**", "/fonts/**", "/images/**", "/js/**");
}
}
6.3. 拦截器原理
根据当前请求,找到
HandlerExecutionChain(可以处理请求的Handler以及Handler的所有拦截器)
先 顺序执行 所有拦截器的
preHandle()方法如果当前拦截器
preHandle()返回为true,则执行下一个拦截器的preHandle()如果当前拦截器
preHandle返回为false,直接倒叙执行所有已经执行了的拦截器的afterCompletion()方法
org.springframework.web.servlet.HandlerExecutionChain.applyPreHandle()/** * Apply preHandle methods of registered interceptors. * @return {@code true} if the execution chain should proceed with the * next interceptor or the handler itself. Else, DispatcherServlet assumes * that this interceptor has already dealt with the response itself. */ boolean applyPreHandle(HttpServletRequest request, HttpServletResponse response) throws Exception { for (int i = 0; i < this.interceptorList.size(); i++) { HandlerInterceptor interceptor = this.interceptorList.get(i); if (!interceptor.preHandle(request, response, this.handler)) { triggerAfterCompletion(request, response, null); return false; } this.interceptorIndex = i; } return true; }
如果任何一个拦截器返回
false直接跳出,不执行目标方法所有拦截器都返回
true,执行目标方法倒叙执行所有拦截器的
postHandle()方法
org.springframework.web.servlet.HandlerExecutionChain.allpyPostHandle/** * Apply postHandle methods of registered interceptors. */ void applyPostHandle(HttpServletRequest request, HttpServletResponse response, @Nullable ModelAndView mv) throws Exception { for (int i = this.interceptorList.size() - 1; i >= 0; i--) { HandlerInterceptor interceptor = this.interceptorList.get(i); interceptor.postHandle(request, response, this.handler, mv); } }前面的步骤有任何异常,均会直接触发所有拦截器的
afterCompletion()方法页面成功渲染完成之后,也会倒序触发
afterCompletion()方法
拦截器的执行流程:

7. 文件上传
7.1. 页面表单
form_layouts.html
<form role="form" th:action="@{/upload}" method="post" enctype="multipart/form-data">
<div class="form-group">
<label for="exampleInputEmail1">Email address</label>
<input type="email" name="email" class="form-control" id="exampleInputEmail1" placeholder="Enter email">
</div>
<div class="form-group">
<label for="exampleInputUsername">Username</label>
<input type="text" name="username" class="form-control" id="exampleInputUsername" placeholder="Enter username">
</div>
<div class="form-group">
<label for="exampleInputFile">Header image</label>
<input type="file" name="headerImg" id="exampleInputFile">
</div>
<div class="form-group">
<label for="exampleInputMultipleFile">life images</label>
<input type="file" name="photos" id="exampleInputMultipleFile" multiple>
</div>
<div class="checkbox">
<label>
<input type="checkbox"> Check me out
</label>
</div>
<button type="submit" class="btn btn-primary">Submit</button>
</form>
7.2. 文件上传代码
com.yourname.adminserver.controller.FormController
/**
* File upload test
*
* @author gregPerlinLi
* @since 2021-11-05
*/
@Slf4j
@Controller
public class FormController {
@GetMapping(value = "form_layouts")
public String formLayouts() {
return "form/form_layouts";
}
/**
* <code>MultipartFile</code>: Automatically encapsulate uploaded files
*
* @param email email
* @param username username
* @param headerImg image
* @param photos images
* @return
*/
@PostMapping(value = "/upload")
public String upload(@RequestParam("email") String email,
@RequestParam("username") String username,
@RequestPart("headerImg") MultipartFile headerImg,
@RequestPart("photos") MultipartFile[] photos) throws IOException {
log.info("Upload information: email={}, username={}, headerImg={}, photos={}",
email, username, headerImg.getSize(), photos.length);
if ( !headerImg.isEmpty() ) {
// Save to file server, OSS server
String originalFilename = headerImg.getOriginalFilename();
headerImg.transferTo(new File("/Users/gregperlinli/Projects/Java/Spring/SpringBoot/admin-server/src/main/resources/cache/" + originalFilename));
}
if ( photos.length > 0 ) {
for (MultipartFile photo : photos) {
if (!photo.isEmpty()) {
String originalFilename = photo.getOriginalFilename();
photo.transferTo(new File("/Users/gregperlinli/Projects/Java/Spring/SpringBoot/admin-server/src/main/resources/cache/" + originalFilename));
}
}
}
return "main";
}
}
7.3. 配置文件最大上传大小限制
application.yaml
spring:
  servlet:
    multipart:
      max-file-size: 10MB
      max-request-size: 100MB
7.4. 自动配置原理
文件上传配置类:org.springframework.boot.autoconfigure.web.servlet.MultipartAutoConfiguration
自动配置好了
StandardServletMultipartResolver(文件上传解析器)原理步骤:
请求进来后,使用文件上传解析器判断(
isMultipart())并封装(调用resolveMultipart并返回MultipartHttpServletRequest)文件上传请求参数解析器解析请求中的文件内容,并封装成
multipartFile
将
Request中的文件信息封装为一个 Map(MultiValueMap<String, MultipartFile>)
com.yourname.adminserver.controller.FormController@PostMapping(value = "/upload") public String upload(@RequestParam("email") String email, @RequestParam("username") String username, @RequestPart("headerImg") MultipartFile headerImg, @RequestPart("photos") MultipartFile[] photos) throws IOException {使用
FileCopyUtils实现文件流的拷贝
8. 异常处理
8.1. 默认规则
By default, Spring Boot provides an
/errormapping that handles all errors in a sensible way, and it is registered as a “global” error page in the servlet container. For machine clients, it produces a JSON response with details of the error, the HTTP status, and the exception message. For browser clients, there is a “whitelabel” error view that renders the same data in HTML format (to customize it, add aViewthat resolves toerror).There are a number of
server.errorproperties that can be set if you want to customize the default error handling behavior. See the “Server Properties” section of the Appendix.To replace the default behavior completely, you can implement
ErrorControllerand register a bean definition of that type or add a bean of typeErrorAttributesto use the existing mechanism but replace the contents.
默认情况下,Spring Boot 提供
/error处理所有错误的映射对于机器客户端,它将生成 JSON 响应,其中包含错误,HTTP 状态和异常消息的详细信息。对于浏览器客户端,响应一个
whitelabel错误视图,以 HTML 格式呈现相同的数据机器客户端:

浏览器客户端:

要对其进行自定义,添加
View解析为error要完全替换默认行为,可以实现
ErrorController并注册该类型的 Bean 定义,或添加ErrorAttributes类型的组件以使用现有机制但替换其内容。error目录下的4xx、5xx页面会被自动解析:
8.2. 定制错误处理逻辑
自定义错误页:
error/404.html、error/5xx.html有精确的错误状态码页面就匹配精确,没有就找4xx.html如果都没有就触发白页
@ControllerAdvice+@ExceptionHandler处理全局异常,其底层是由ExceptionHandlerExceptionResolver提供处理支持(推荐使用此方法)@ResponseStatus+ 自定义异常,其底层是由ResponseStatusExceptionResolver提供处理支持,把responseStatus注解的信息组装成ModelAndView返回,底层会调用response.sendError(statusCode, resolvedReason);,让 Tomcat 发送/errorSpring 底层的异常,(如:参数类型转换异常),
DefaultHandlerExceptionResolver处理框架底层的异常response.sendError(HttpServletResponse.SC_BAD_REQUEST, ex.getMessage());
自定义实现
HandlerExceptionResolver处理异常,可以作为默认的全局异常处理规则
ErrorViewResolver实现自定义处理异常:response.sendError:error请求就会转给 Controller- 当异常没有任何解析器能够处理时,Tomcat 底层执行
response.sendError,error请求就会转给 Controller basicErrorController要转去的页面地址是ErrorViewResolver
8.3. 异常处理自动配置原理
ErrorMvcAutoConfiguration自动配置异常处理规则容器中的组件:
类型:
DefaultErrorAttributes→ ID:errorAttributespublic class DefaultErrorAttributes implements ErrorAttributes, HandlerExceptionResolver { }DefaultErrorAttributes:定义错误页面中可以包含哪些数据org.springframework.boot.web.servlet.error.DefaultErrorAttributes.getErrorAttributes()@Override public Map<String, Object> getErrorAttributes(WebRequest webRequest, ErrorAttributeOptions options) { Map<String, Object> errorAttributes = getErrorAttributes(webRequest, options.isIncluded(Include.STACK_TRACE)); if (!options.isIncluded(Include.EXCEPTION)) { errorAttributes.remove("exception"); } if (!options.isIncluded(Include.STACK_TRACE)) { errorAttributes.remove("trace"); } if (!options.isIncluded(Include.MESSAGE) && errorAttributes.get("message") != null) { errorAttributes.remove("message"); } if (!options.isIncluded(Include.BINDING_ERRORS)) { errorAttributes.remove("errors"); } return errorAttributes; } private Map<String, Object> getErrorAttributes(WebRequest webRequest, boolean includeStackTrace) { Map<String, Object> errorAttributes = new LinkedHashMap<>(); errorAttributes.put("timestamp", new Date()); addStatus(errorAttributes, webRequest); addErrorDetails(errorAttributes, webRequest, includeStackTrace); addPath(errorAttributes, webRequest); return errorAttributes; }
类型:
BasicErrorController→ ID:basicErrorController(JSON + 白页适配响应)- 处理默认
/eroor路径的请求,页面响应new ModelAndView("error", model); - 容器中有组件
View,其 ID 为error(相应默认错误页) - 容器中有组件
BeanNameViewResolver(视图解析器,按照返回的视图名称作为组件的 ID 去容器中找View对象)
- 处理默认
类型
DefaultErrorViewResolver→ ID:conventionErrorViewResolver- 如果发生错误,会以 HTTP 状态码作为视图页地址(
viewName),找到真正的页面 err/viewName.html(其中的viewName是 HTTP 状态码,如:404、500等)
- 如果发生错误,会以 HTTP 状态码作为视图页地址(
如果想要返回页面,就会寻找
error视图StaticView(默认是一个白页)返回 JSON 数据:
org.springframework.boot.autoconfigure.web.servlet.error.BasicErrorController.error()@RequestMapping public ResponseEntity<Map<String, Object>> error(HttpServletRequest request) { HttpStatus status = getStatus(request); if (status == HttpStatus.NO_CONTENT) { return new ResponseEntity<>(status); } Map<String, Object> body = getErrorAttributes(request, getErrorAttributeOptions(request, MediaType.ALL)); return new ResponseEntity<>(body, status); }返回 HTML 页面:
org.springframework.boot.autoconfigure.web.servlet.error.BasicErrorController.errorHtml()@RequestMapping(produces = MediaType.TEXT_HTML_VALUE) public ModelAndView errorHtml(HttpServletRequest request, HttpServletResponse response) { HttpStatus status = getStatus(request); Map<String, Object> model = Collections .unmodifiableMap(getErrorAttributes(request, getErrorAttributeOptions(request, MediaType.TEXT_HTML))); response.setStatus(status.value()); ModelAndView modelAndView = resolveErrorView(request, response, status, model); return (modelAndView != null) ? modelAndView : new ModelAndView("error", model); }
8.4. 异常处理步骤流程
执行目标方法,目标方法运行期间有任何异常都会被抓取并标志当前请求已结束,之后用
DispatchException将其封装进入视图解析流程(页面渲染)
processDispatchResult(processedRequest, response, mappedHandler, mv, dispatchException);processHandlerException():处理Handler发生的异常,处理完后返回ModelAndView遍历所有的
handlerExceptionResolver看哪个可以处理当前异常(**HandlerExceptionResolver处理器异常解析器**)
系统默认的异常解析器:

DefaultErrorAttribute先处理异常,将异常信息保存到 Request 域,并返回null当没有任何系统默认的异常解析器能够处理异常时,将会抛出异常
如果没有任何解析器能处理,最终底层会发送
/error请求,被底层的BasicErrorCOntroller处理解析错误视图:遍历所有的
ErrorViewResolver看哪个可以解析
默认的
DefaultErrorViewResolver,作用是把响应状态码作为错误页的地址,拼接成error/statusValue.html模板引擎最终响应这个页面
error/statusValue.html
9. Web 原生组件注入(Servlet、Filter、Listener)
9.1. 使用原生 Servlet API
@ServletComponentScan(basePackages = "com.yourname"): 指定原生Servlet组件都放在那里@WebServlet(name = "MyServlet", urlPatterns = "/my"): 指定原生 Servlet 应用,效果:直接响应, 而且不会经过 Spring 的拦截器(因为经过 Spring 拦截器的前提是要经过DispatcherServlet的doDispatch()方法)@WebFilter(filterName = "MyFilter",urlPatterns = {"/css/*", "/images/*"}): 指定原生的 Filter 过滤器(过滤某个目录下的所有请求时,原生 Servlet 过滤器使用/*,SpringMVC 拦截器则使用/**)@WebListener: 指定原生的 Listener 监听器
示例代码:
com.yourname.adminserver.AdminServerApplication
/**
 * Handling exceptions in the entire web
 *
 * @author gregPerlinLi
 * @since 2021-11-05
 */
@Slf4j
@ControllerAdvice
public class GlobalExceptionHandler {

    @ExceptionHandler(value = {ArithmeticException.class, NullPointerException.class})
    public String handleArithmeticException(Exception e) {

        log.error("The exception is: {}", e.toString());
        // Return view address
        return "login";
    }
}
com.yourname.adminserver.servlet.MyServlet
/**
 * @author gregPerlinLi
 * @since 2021-11-05
 */
@WebServlet(name = "MyServlet", urlPatterns = "/my")
public class MyServlet extends HttpServlet {

    @Override
    protected void doGet(HttpServletRequest req, HttpServletResponse resp) throws ServletException, IOException {
        resp.getWriter().write("Hello servlet!");
    }
}
com.youranme.adminserver.filter.MyFilter
/**
 * @author gregPerlinLi
 * @since 2021-11-05
 */
@Slf4j
@WebFilter(filterName = "MyFilter",urlPatterns = {"/css/*", "/images/*"})
public class MyFilter implements Filter {
    @Override
    public void init(FilterConfig filterConfig) throws ServletException {
        log.info("MyFilter initialize complete...");
    }

    @Override
    public void doFilter(ServletRequest request, ServletResponse response, FilterChain chain) throws IOException, ServletException {
        log.info("MyFilter is working...");
        chain.doFilter(request, response);
    }

    @Override
    public void destroy() {
            log.info("MyFilter destroyed...");
    }
}
com.yourname.adminserver.listener.MyServletContextListener
/**
 * @author gregPerlinLi
 * @since 2021-11-05
 */
@Slf4j
@WebListener
public class MyServletContextListener implements ServletContextListener {
    @Override
    public void contextInitialized(ServletContextEvent sce) {
        log.info("MyServletContextListener: listening to the completion of project initialization!");
    }

    @Override
    public void contextDestroyed(ServletContextEvent sce) {
        log.info("MyServletContextListener: listening to the project destruction!");
    }
}
扩展:DispatchServlet 如何注册进入 Servlet
容器中自动配置了
DispatcherServlet组件,并将属性绑定到了WebMvcProperties,对应的配置文件配置项是spring.mvc通过
ServletRegistrationBean<DispatcherServlet>将DispatcherServlet配置进来application.yamlspring: mvc: servlet: path: /- 默认映射的是
/路径

- 默认映射的是
对于 Tomcat- Servlet,多个 Servlet 都能处理到同一层路径时,以精确优先为原则(例如,当 A 的路径为 /my/,B 的路径为 /my/1 时,B 优先于 A 执行)
拓展:Filter 和 Interceptor 的区别:
Filter: Filter 过滤器是 Servlet 定义的原生组件,优点是脱离了 Spring 框架也可以使用
Interceptor: Interceptor 是 Spring 定义的接口,优点是可以使用 Spring 定义的各种功能(如自动注入 @Autowired)
9.2. 使用 RegistrationBean
原生 Web 组件加入 Spring 框架推荐使用此方式
ServletRegistrationBean注册 Servlet 应用FilterRegistrationBean注册 Filter 过滤器ServletListenerRegistrationBean注册 Listener 监听器
示例代码:
com.yourname.adminserver.config.MyRegistrationConfig
/**
* <code>@Configuration(proxyBeanMethods = true)</code>: Ensure that the dependent components are always single instance
*
* @author gregPerlinLi
* @since 2021-11-05
*/
@Configuration(proxyBeanMethods = true)
public class MyRegistrationConfig {
@Bean
public ServletRegistrationBean myServlet() {
MyServlet myServlet = new MyServlet();
return new ServletRegistrationBean(myServlet, "/my", "/my02");
}
@Bean
public FilterRegistrationBean myFilter() {
MyFilter myFilter = new MyFilter();
// return new FilterRegistrationBean(myFilter, myServlet());
FilterRegistrationBean filterRegistrationBean = new FilterRegistrationBean(myFilter);
filterRegistrationBean.setUrlPatterns(Arrays.asList("/my", "/js/*"));
return filterRegistrationBean;
}
@Bean
public ServletListenerRegistrationBean myListener() {
MyServletContextListener myServletContextListener = new MyServletContextListener();
return new ServletListenerRegistrationBean(myServletContextListener);
}
}
10. 嵌入式 Servlet 容器
10.1. 切换嵌入式 Servlet 容器
默认支持的 Web Server:
Tomcat、Jetty 或者是 Undertow
ServletWebServerApplicationContext容器启动寻找ServletWebServerFactory并引导创建服务器切换服务器

pom.xml<dependency> <groupId>org.springframework.boot</groupId> <artifactId>spring-boot-starter-web</artifactId> <exclusions> <exclusion> <groupId>org.springframework.boot</groupId> <artifactId>spring-boot-starter-tomcat</artifactId> </exclusion> </exclusions> </dependency>
原理:
- SpringBoot 应用启动发现当前是 Web 应用,Web 场景包 → 导入Tomcat
- Web 应用会创建一个 Web 版的 IOC 容器
ServletWebServerApplicationContext ServletWebServerApplicationContext启动的时候寻找ServletWebServerFactory(Servlet 的 Web 服务器工厂 → Servlet 的 Web 服务器)- SpringBoot 底层默认有很多的
WebServer工厂,例如:TomcatServletWebServerFactory,JettyServletWebServerFactory或者是UndertowServletWebServerFactory - 底层直接会有一个自动配置类:
ServletWebServerFactoryAutoConfiguration ServletWebServerFactoryAutoConfiguration导入了ServletWebServerFactoryConfiguration(配置类)ServletWebServerFactoryConfiguration配置会根据动态判断系统中到底导入了那个 Web 服务器的包(默认是web-starter导入 Tomcat 包),容器中就有TomcatServletWebServerFactoryTomcatServletWebServerFactory创建出 Tomcat 服务器并启动,TomcatWebServer的构造器拥有初始化方法initialize()→this.tomcat.start();- 内嵌服务器,就是手动把启动服务器的代码调用(前提是 Tomcat 核心 Jar 包必须存在)
10.2. 定制 Servlet 容器
- 实现
WebServerFactoryCustomizer<ConfigurableServletWebServerFactory>- 把配置文件的值和
ServletWebServerFactory进行绑定
- 把配置文件的值和
- 修改配置文件
server.xxx - 直接自定义
ConfigurableServletWebServerFactory
xxxCustomizer:定制化器,可以改变 xxx 的默认规则
import org.springframework.boot.web.server.WebServerFactoryCustomizer;
import org.springframework.boot.web.servlet.server.ConfigurableServletWebServerFactory;
import org.springframework.stereotype.Component;
@Component
public class CustomizationBean implements WebServerFactoryCustomizer<ConfigurableServletWebServerFactory> {
@Override
public void customize(ConfigurableServletWebServerFactory server) {
server.setPort(9000);
}
}
11. 定制化原理
11.1. 定制化常见方式
@Bean替换、增加容器中默认组件,视图解析器修改配置文件
xxxCustomizer便携自定义的配置类
xxxConfigueationWeb 应用,编写一个配置类实现
WebMvcConfiguration即可定制化 Web 功能,+@Bean给容器中再扩展一些组件@Configuration public class AdminWebConfig implements WebMvcConfigurer { }@EnableWebMvc+WebMvcConfigurer→@Bean可以全面接管 SpringMVC,所有的规则全部自己重新设置,实现定制和拓展功能 (注意⚠️:如果启用全面接管, SpringBoot 所有的自动配置、解析器、转换器等等都将会失效,慎用!慎用!!慎用!!!没那个本事千万不要打开!)
com.yourname.adminserver.config.AdminWebConfig/** * <p>1. Write an interceptor to implement the {@code HandlerInterceptor} interface</p> * <p>2. The interceptor is registered in the container (realization {@code WebMvcConfigurer.addInterceptors()})</p> * <p>3. Specify interception rules (If all resources are intercepted, static resources will also be intercepted)</p> * <p>4. {@code @EnableWebMvc}: Full takeover SpringMVC</p> * <p> 1. Static resource, view resolver, welcome page... all invalid</p> * * * @author gregPerlinLi * @since 2021-11-03 */ @EnableWebMvc @Configuration public class AdminWebConfig implements WebMvcConfigurer { /** * Define static resource behavior * * @param registry registry */ @Override public void addResourceHandlers(ResourceHandlerRegistry registry) { // Access /aa/** all requests are matched under classpath:/static/ registry.addResourceHandler("/aa/**") .addResourceLocations("classpath:/static/"); } @Override public void addInterceptors(InterceptorRegistry registry) { registry.addInterceptor(new LoginInterceptor()) // All requests will be blocked, including static resources are also blocked .addPathPatterns("/**") // Request for release .excludePathPatterns("/", "/login", "/css/**", "/fonts/**", "/images/**", "/js/**", "/aa/**"); } }原理:
WebMvcAutoConfiguration是默认的 SpringMVC 的自动配置功能类,负责静态资源,欢迎页,视图解析器等的配置一旦使用
@EnableWebMvc,将会执行@Import(DelegatingWebMvcConfiguration.class)DelegatingWebMvcConfiguration的作用:只保证 SpringMVC 最基本的使用获取所有系统中的
WebMvcConfigurer,所有功能的定制都由这些WebMvcConfigurer共同生效自动配置了一些非常底层的组件
RequestMappingHandlerMapping、这些组件所依赖的组件均在容器中获取:public class DelegatingWebMvcConfiguration extends WebMvcConfigurationSupport { }
若要让
WebMvcAutoConfiguration中的配置生效,必须实现以下条件注解:@ConditionalOnMissingBean(WebMvcConfigurationSupport.class)因此,
@EnableWebMvc的启用将会导致WebMvcAutoConfiguration失效
……
11.2. 原理分析套路
- 场景
starter xxxAutoConfiguration- 导入 xxx 组件
- 绑定
xxxProperties - 绑定配置文件项